LG LSC26905TT Owner's Manual - Page 10
Operation Instruction Guide - water filter
 |
View all LG LSC26905TT manuals
Add to My Manuals
Save this manual to your list of manuals |
Page 10 highlights
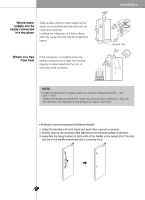
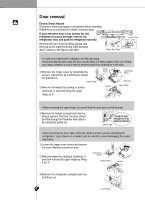
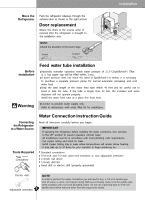
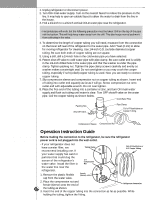
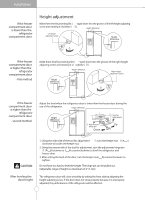
Installation Connect the Tubing to Water Line 1. Unplug refrigerator or disconnect power. 2. Turn OFF main water supply. Turn on the nearest faucet to relieve the pressure on the line. It may help to open an outside faucet to allow the water to drain from the line in the house. 3. Find a 1/2-inch to 1-1/4-inch vertical COLD water pipe near the refrigerator. NOTE • Horizontal pipe will work, but the following precaution must be taken: Drill on the top of the pipe not the bottom. This will help keep water away from the drill. This also keeps normal sediment from collecting in the valve. 4. To determine the length of copper tubing you will need, measure from the connection on the lower left rear of the refrigerator to the water pipe. Add 7 feet (2.1m) to allow for moving refrigerator for cleaning. Use 1/4-inch O.D. (outside diameter) copper tubing. Be sure both ends of copper tubing are cut square. 5. Using a drill, drill a 1/4-inch hole in the cold water pipe you have selected. 6. Fasten shut-off valve to cold water pipe with pipe clamp. Be sure outlet end is solidly in the 1/4-inch drilled hole in the water pipe and that the washer is under the pipe clamp. Tighten packing nut. Tighten the pipe clamp screws carefully and evenly so washer makes a watertight seal. Do not overtighten or you may crush the cooper tubing, especially if soft (coiled) copper tubing is used. Now you are ready to connect copper tubing. 7. Slip compression sleeve and compression nut on copper tubing as shown. Insert end of tubing into outlet end squarely as far as it will go. Screw compression nut onto outlet end with adjustable wrench. Do not over tighten. 8. Place the free end of the tubing into a container or zinc, and turn ON main water supply and flush out tubing until water is clear. Turn OFF shutoff valve on the water pipe. Coil the copper tubing as shown below. Cold Water Pipe Packing Nut Shut Off Valve Pipe Clamp Coil of Polyethylene or Copper Tubing Compression Sleeve Compression Nut Operation Instruction Guide Connect the Tubing to the Refrigerator Before making the connection to the refrigerator, be sure the refrigerator power cord is not plugged into the wall outlet. • If your refrigerator does not have a water filter, we recommend installing one. If Tubing Clamp 1 your water supply has sand or particles that could clog the screen of the refrigerator's water valve. Install the filter in 1/4" Compression Nut the water line near the refrigerator. 2 1. Remove the plastic flexible cap from the water valve. Ferrule (sleeve) Coil of Polyethylene or 1/4" Cooper Tubing 2. Place the compression nut and ferrule (sleeve) onto the end of Refrigerator Connection 10 the tubing as shown. 3. Insert the end of the copper tubing into the connection as far as possible. While holding the tubing, tighten the fitting. 6
-
 1
1 -
2
-
3
-
4
-
 5
5 -
 6
6 -
 7
7 -
 8
8 -
 9
9 -
 10
10 -
 11
11 -
 12
12 -
 13
13 -
 14
14 -
 15
15 -
16
-
17
-
18
-
19
-
20
-
21
-
22
-
23
-
24
-
25
-
26
-
27
-
28
-
29
 |
 |
