LG M237WD-PM Owner's Manual (English) - Page 24
Auto Con RGB [PC] mode only, This function is available for RGB signals only. - 23
 |
UPC - 888939000601
View all LG M237WD-PM manuals
Add to My Manuals
Save this manual to your list of manuals |
Page 24 highlights
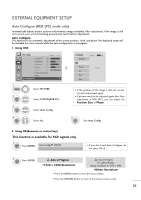
EXTERNAL EQUIPMENT SETUP Auto Configure (RGB [PC] mode only) Automatically adjusts picture position and minimizes image instability. After adjustment, if the image is still not correct, your set is functioning properly but needs further adjustment. Auto configure This function is for automatic adjustment of the screen position, clock, and phase The displayed image will be unstable for a few seconds while the auto configuration is in progress. 1. Using OSD PICTURE D • Contrast Move : 90 • Brightness : 50 • Sharpness : 70 • Colour : 50 • Tint :0 R • Advanced Control • Reset Screen(RGB-PC) Enter G 1 MENU 2 ENTER Select PICTURE. Select SCREEN(RGB-PC). 3 ENTER Select Auto Config. SCREEN Resolution Move BACK Prev. Auto Config. G Position Size To Set Phase Reset • If the position of the image is still not correct, try Auto adjustment again. • If picture needs to be adjusted again after Auto adjustment in RGB (PC), you can adjust the Position, Size or Phase. 4 ENTER Select Yes. 5 ENTER Run Auto Config. 2. Using OK(Remocon or control key) This function is available for RGB signals only. 1 ENTER Press ENTER. Auto Config. G OK( ) • If you don't want Auto Configure, do not press OK 2 ENTER Press ENTER. Auto in Progress Auto in Progress For optimal display change resolution to 1920 x 1080 • Press the MENU button to close the menu window. • Press the RETURN button to move to the previous menu screen. 23
-
 1
1 -
2
-
3
-
4
-
5
-
6
-
7
-
8
-
9
-
10
-
11
-
12
-
13
-
14
-
15
-
16
-
17
-
18
-
 19
19 -
 20
20 -
 21
21 -
 22
22 -
 23
23 -
 24
24 -
 25
25 -
 26
26 -
 27
27 -
 28
28 -
 29
29 -
30
-
31
-
32
-
33
-
34
-
35
-
36
-
37
-
38
-
39
-
40
-
41
-
42
-
43
-
44
-
45
-
46
-
47
-
48
-
49
-
50
-
51
-
52
-
53
-
54
-
55
-
56
-
57
-
58
-
59
-
60
-
61
-
62
-
63
-
64
-
65
-
66
-
67
-
68
-
69
-
70
-
71
-
72
-
73
-
74
-
75
-
76
-
77
-
78
-
79
-
80
-
81
-
82
-
83
-
84
-
85
-
86
-
87
 |
 |
