LG M4201C-BA User Guide
LG M4201C-BA - LG - 42" LCD Flat Panel Display Manual
 |
UPC - 719192182530
View all LG M4201C-BA manuals
Add to My Manuals
Save this manual to your list of manuals |
LG M4201C-BA manual content summary:
- LG M4201C-BA | User Guide - Page 1
USER'S GUIDE - LG M4201C-BA | User Guide - Page 2
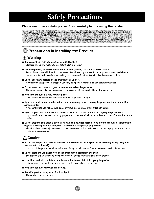
_a_res, eiec_ _k or fi_ can occur, II If yOU dmpp_ the product or t_ _e is broken, t_rn off the product and _n_ug the power co_, - ff y_ contin_ b _ _t_ _r_ prope_4 _asu_., e_n_J s_k or fire can _r. Conta_ the _e center. I _ not d_ metallico_ects s_h as _ins, hair - LG M4201C-BA | User Guide - Page 3
e_e_l_ _s, electrical ap_|ar_es or e|_r|ca! heste_ to a sin,g|eoutleL Usea power _t with a g_un,ding _min_ designedfor exclusi_ u_ with the,computer. oA fire _n, , ff me cord pin,Is w_,tor cover,_ with dust, dw the power p_ugcomp_tely orwi_ dust _. You may I_ elec_oc_ed _ toe×ce_ m_ture, • ff - LG M4201C-BA | User Guide - Page 4
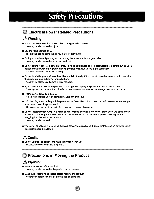
_y be impaired if y_ _ at the p_uct too d_. [] Set the appro_ reso_ -Yo_ v_ion _ b_ imp_. and cl_k I_ refuting to. the User's Manual [] Use auth_ deterge_ only w_n cleanin_ the product (Doi not use _nzene, thinner or _coh_.) - PredL_t _ be deformed. On Disposal I,, _ fluo_ lamp u_d in - LG M4201C-BA | User Guide - Page 5
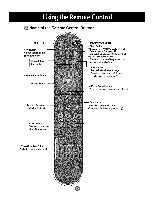
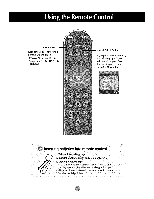
Name of the Remote Control Buttons • M_u Button ,,ExffButton ° Vo|ume < I_ Button * Ch_k Button * ARC button To se[e_ the image size of the _reen. - LG M4201C-BA | User Guide - Page 6
Bu_on If you press the button or_e, the following Input Sig_I Window wHIIappear. _lect the signal type you want using the y A button. Inse ing ba ries into remote control. 1, Take out the battery cap, 2, insert the batteries with correct polar_ (+/-). 3, Close the battery cap. You can u_ a _mote - LG M4201C-BA | User Guide - Page 7
only for models th_ su_o_ the stand ]., Disassemble the stand cover. The cover may be easily disassembled by pressing up on the base as shown in the figure _° After connecting the cables, correctly position the stand cover into the holes on the stand.. If securely connected, you w[]_ hear the - LG M4201C-BA | User Guide - Page 8
* Applica_e only for models that sup_rt the speakers U_ the screws to secure the speakers on the rear side of the pr_uct as shown in the below figure. ...... !L.... When the speaker is instaiied. - LG M4201C-BA | User Guide - Page 9
* The product image in the, user's guide could _ different from the actual image, Rear View @ Power Connector : Connect the power cord @ Wir_ I_ Power conn_tor Remote Co_rol Pod and image may differ according to mo_l. R_232C Serial Pods RGB, HDMI/DVI Po_s PC Sound Jack : _nn_ the audio cable - LG M4201C-BA | User Guide - Page 10
_®ter since _ ii_compa_ib_ I ,_dadpmleorsishav_ae_rlab_ain(nt_ot |mr__;*l__e) t (Ditte_e_t sign_ir_9 system) 1 Rear side elfthe product. @ Cermet the Audio cable. Rear side of the product, Connect the power cord., _r s_ _ t_ _ct. - LG M4201C-BA | User Guide - Page 11
Q Turn on power by pressing 'the power button on the pr_u_i. _Tum on t_ PC, Power b_on - LG M4201C-BA | User Guide - Page 12
Use this function wh_ displaying ANALOG RGB inputs of a PC to the other product. • To use different products connoted to e_h, other Connect one end of the signal inp_ cab]e(15-pin D-Sub Signal Cable) to the RGB OUT connector d product I and connect the other end to, the RGB IN connector of other - LG M4201C-BA | User Guide - Page 13
_nneot the vi,d_ cable, as shown in the bel_ figure and then conn,_t the p_er _rd (See page A9). When conn_ing with a BNC cable. • Connect the, input termina_ with a proper color match. When c,onneoting with a S-Vid_ cable. • Connect to the S-Video input terminal to watch high image quality movies - LG M4201C-BA | User Guide - Page 14
Connect the vid_audio cable as shown in the _low figure and then, conne_ the power _d (_ page Ag). - _nnect the input te_inal with a p_per color match, Product Produd HDW R_eiv_ HDW R_6_r Se,l_ an input signal. Press the INPUT - LG M4201C-BA | User Guide - Page 15
Conn_t Me vi_audio _b.le as shown in,the _low figure and then conn_ the power cord (See page A9). Product Product Product Cabie, _Sub Signal Cable RCA-_ A_io Cable VCRA)VD/_4_J _x Se!_ an input signal, Press the INPUT - LG M4201C-BA | User Guide - Page 16
• When you set t_ input sigir_:_ _ the main screen as 'AV (CVBS),', you can transm_ Me signa_ that you're watching to the AV output te_inal, Video[gV _C Cab_ (not included) Audio Cable (not include) Product ii!Xii BNC Cable (not _ncl_) Vid_/TV - LG M4201C-BA | User Guide - Page 17
thiat suppo_ the stand * Set it up dose to the wall so t_ product _sn't fail over when it is p_hed backwards. Tf'_ instructions shown below is must pt_rchase separately) on the waiL 3 Use a _urdy rope (not provi_d as parts o# the product, must purchase separately) to tie, _e product, It is safer - LG M4201C-BA | User Guide - Page 18
Name of the Bu_ons in the Screen Adjustment Unit • Press this b_ turn it ot, to turn on the power, Press his bul_ again to _i_ ower .i..n. dicaio D • Tmhoisdein)difcfatthorediiigs_psla,yuipsgirninsleewph(eEnnethregydSisa,vpi_nagyo)pmeordaete,s thnoi_sianlyd(oi_cator colorchanges to amber , Use - LG M4201C-BA | User Guide - Page 19
Name of the Buttons in the Screen Adjustment Unit (_ Ab_O/SET BL_on ) [ForPCAnalogsignall [When XGA Mode is ac_ve and 13,60 X768 is _l_t_] INPUT _ V A _ ,' Se_ t_ in_¢ _gn_ AUTO/SET AV Com_ite Vi_, _p_ate Vi_ C_p_ent I HD_, DVD HDTV', DVD RG8 15_pin D_b ar_log _gna_ HDMI_VI D_i_l s_nal - LG M4201C-BA | User Guide - Page 20
OSD Menu Function Description Adjusts _reen brigh_ess, _ntrast and color that you prefer. S_ND Adjusts the timer function. Adjusts the _r_n vide. _NE_ - LG M4201C-BA | User Guide - Page 21
How to adjust t_ OSD (On ,Scr_n Display) scr_ • Use the remote control to adj ust the OSD screen. Press the MENU B_ton, then the main menu of _e OSD appears. When the i_n 'you want becomes highlighted, press the S_ Button. U_ the V A _11 _ Buttons to adjust the item to the desired level. Accept - LG M4201C-BA | User Guide - Page 22
adiust the _nt to desired level, _lect[ng a factory _ing color set. • Warm : Slightly r_dish white. • Norma_ "Slightly Ibluish white. ° Cooi_ : Slightiy Ipurp}ish white, ° User : Select this opti_ to u_ the, user-defined set_ng& Red t Gre_ t Blue Set your own color levels, - LG M4201C-BA | User Guide - Page 23
Adjusting Screen Color XD ×D is LG Ele_roni_ unique Ipi_um improvi_ techr#_ogy to display is activated after selecting the Use_ or User2 of PSM * Auto : XD is automaticaJ_y chan_ to Auto. o Manual : When _ecting the Man_ you can adjust the XD Contrast, XID _lour, MPEG NR. XID NR, Advanced • - LG M4201C-BA | User Guide - Page 24
rich and profound _und to_ ff you _t the Surround MAX _, user audio setfJng c_ not be adjusted. ,' Flat : The mo_ _mma_ir@ and r_tura! audb. • Music : sele_ and r_ht speaker, You _n adjust internal spe_akerstatus, IIfyou want to u_ your e×temaf hFfi _ereo _stem,, turn _ the internal speakers of the - LG M4201C-BA | User Guide - Page 25
Cl_k ff the time is on t}'_ clock is incorrect, r_et the c_ock manually. 1) Press t_ MENU button _d then use T & button to _[_t t}'_n u_ T A bu_on to select On or _. Note , In the event of power ir[te_uption (discon_ction or power failure), t_ dock must be reset. • Once the on or off time is _t - LG M4201C-BA | User Guide - Page 26
screen for a long peri_ of time, Normal : If ima_ s_cking is _ver a problem, ISM is not _cessary -set to No_aL White wash : wh_e wash removes pe_a_nt images : This is fun_on to inve_ the _nel co,or of the screen. The panel co,or is autom_aHy inverted every 30 minutes. You can a_ign a uniq_ _t - LG M4201C-BA | User Guide - Page 27
Selecting the options • To use this function - Mu_ _ displayed with vario_ o_er produ_s,_ Must _ in a fu_ion that can be contacted to RS-2_C or RG80_ Tilie m_e it is used to enlarge the scre_ and aim us_ wih several products to ViM screen, • Tile Mode TiLemode and choose Tile alignment a_ set - LG M4201C-BA | User Guide - Page 28
Selecting the options Tile rn_e (product 1 ~ 9) : r(3) x c(3) 'i rOW Tt_emode (product I _ 2) : r(2) x c(1) tow - Tile mode (product _ -16) : _4) x c(4) row column - LG M4201C-BA | User Guide - Page 29
a_ the screen returns to FuBscreen Pow_ Ilndicato,r Use this func_o,n to set the power indicator on the front side of the product to On or _, ff you set Off , it wiB _ off, ff you set On at any time, the power indicator will automatically be turned on, L_ Ught Use _is function to set the - LG M4201C-BA | User Guide - Page 30
isn't clear after auto adjustment and e_ecially tt-_t characlem are stil! tremblir_j, adjust the pi_ure phase manually. It's n_ available to _e Phase, Cl_k functio_ in RGB DTV, Comported, HDMVDVl IDTV.) Clock improved o_ _er picture qualify,, select the same m_e correspo_ing to compeer resolution° - LG M4201C-BA | User Guide - Page 31
to 3 of _neral AV You can enjoy the cinema (_e pictureformat_ 16:9) _ _nera] TV programme thorough the 16:9 mo_. The screen !6:9 is viewed j_t like t_3t b_ the • X • X • X X X X X • • • X • X U_ this func4Jon to reset the producl to the tacto_ defiau_t.(Manual eonfigl, manu only) - LG M4201C-BA | User Guide - Page 32
. @ Is _ power indicator light on? , _e if the power sw_tch is _m_ on. @ Power is on, pow_ to the _ecff_tions in this manual. * M_imum resoluOon - 32 / 37 / 42 inch m_el RGB : 1600 x play function is supposed by referri_ to the video card user manual,. @ The 'Cont:ro[s Locked' message appears - LG M4201C-BA | User Guide - Page 33
_rd re_l_on a_ frequency are sup_rted by the produd, if the frequency is oN of r_ge. set to,the rec_me_3_ resoluti® in the Control Panel- Display- .Settingmenu_ DSub analog signal- Press the "AUTO" button in the remote control to automati_lly se_e_ optimal _reeo status that fits into the current - LG M4201C-BA | User Guide - Page 34
Screen has poor _lor re_ufl_ the number of colors to more th_ 24 bks (true "Sie_ corot) Sel_ Cont_l Panel- Display- Settings - _or Table menu in Widows, @ Screen co, or is unstable or monoo • Check , which can be _dbutable to the unique c_racteHstJcs of the. LCD panel It is not a maJNn_ion of the - LG M4201C-BA | User Guide - Page 35
The product specifications can change without prior notice for product improvement. LCD Panel [32 inch] [37 inch] [42 inch] [32 inch] Rated Vo_ge [37 inch] Rated Vo|tage [42 inch] Rated Voltage 32 inches (80.04 cm) TF (Thin Film TransistoO LCD (Liquid Cr_,stal Display) Panel Visible diag_al size: - LG M4201C-BA | User Guide - Page 36
specifications can change without prior notice for pr_uct [11 [21 W [3] [4] Width x Height x Depth [32 inch] [1] 80._ _ (31.61 i_es) x 54._ (21._ inct'_) x 18._ _ (7.09 in_es) 80._ _ (31.61 ir@es) x 49,,_ _ (19.4 inches (4._ inches) x _.TF crn (8._ inches) x 11,_ _ (4.53 inches) [42 inch] - LG M4201C-BA | User Guide - Page 37
The product s_ifications can change, w_houl prior' notice for product Net [32 inch] [1]19.4 kg (42.1/_) [3] 21,1 kg (_.,52 Ibs) [37 inch] E3,]30,_5 (6724Ibs) [42 inch] [1] 352 kg _7,_ _) [3] _,0 kg (_.77 Ibs) [2] 16.0 kg (35.27 _bs) [4] 17.7 kg (39.02 _) [4] 2&7 kg (56,_ _) [2] _,8 kg (67_ _) [4] - LG M4201C-BA | User Guide - Page 38
The pr_uct specifications can change without prior notice for pr_u_ Vi_ Signal ! i¸ i Max, Res_ut_on RGB : 1600 X 12_ @_Hz HDMI : -20_C ~ 60°,C, Humidity: 5% _ _% * Applica_e only for models that sup_rt the slp_kers iRMS Audio Output ilnp_ Sensitivity Speaker impedance 10W+10W(R+L) 0.7Vrms 8_2 - LG M4201C-BA | User Guide - Page 39
VESA12:80 x 1024 6&981 6O VESA1280 x 1024 7&98 75 VESA1600 x 1200, 75,00 60 RG B : Mode 1 ~ Mode 19 HDM_/DVI " Mode 1 ~ Mode 17 @ DW M_e o x x 0 X X 0 0 O o o o ,0 0 O 0 0 O @ Power Indicator' On Mode, S_eep Mode _f Mode Green Am_r - LG M4201C-BA | User Guide - Page 40
m_nting Connect_ to another obiect (stand type and wall-mounted _pe,) This product accepts a VESA_mpliant mounting inte#ace pad_= (This has to _ purchased separately if required.) For fu_her information, refer to the VESA Wall Mounting Instruction Guide, t Ke_ingt_ separately Connected separately
-
 1
1 -
 2
2 -
 3
3 -
 4
4 -
 5
5 -
 6
6 -
 7
7 -
8
-
9
-
10
-
11
-
12
-
13
-
14
-
15
-
16
-
17
-
18
-
19
-
20
-
21
-
22
-
23
-
24
-
25
-
26
-
27
-
28
-
29
-
30
-
31
-
32
-
33
-
34
-
35
-
36
-
37
-
38
-
39
-
40
 |
 |

USER'S GUIDE