LG P506 Owner's Manual - Page 17
Charging your phone
 |
View all LG P506 manuals
Add to My Manuals
Save this manual to your list of manuals |
Page 17 highlights
Getting Started 3 Insert the battery into place by aligning the gold contacts on the phone and the battery. Charging your phone Plug the USB cable (as shown below) into the phone's accessory/charger port. Make sure the 'B' side is facing upwards. 4 Replace the back cover of the phone (as demonstrated below). Apply a steady downward pressure until the battery cover clicks into place. n NOTE The battery must be fully charged initially to improve battery lifetime. n NOTE Your phone has an internal antenna. Be careful not to scratch or damage this rear area, as that will cause loss of performance. 15
-
 1
1 -
2
-
3
-
4
-
5
-
6
-
7
-
8
-
9
-
10
-
11
-
 12
12 -
 13
13 -
 14
14 -
 15
15 -
 16
16 -
 17
17 -
 18
18 -
 19
19 -
 20
20 -
 21
21 -
 22
22 -
23
-
24
-
25
-
26
-
27
-
28
-
29
-
30
-
31
-
32
-
33
-
34
-
35
-
36
-
37
-
38
-
39
-
40
-
41
-
42
-
43
-
44
-
45
-
46
-
47
-
48
-
49
-
50
-
51
-
52
-
53
-
54
-
55
-
56
-
57
-
58
-
59
-
60
-
61
-
62
-
63
-
64
-
65
-
66
-
67
-
68
-
69
-
70
-
71
-
72
-
73
-
74
-
75
-
76
-
77
-
78
-
79
-
80
-
81
-
82
-
83
-
84
-
85
-
86
-
87
-
88
-
89
-
90
-
91
-
92
-
93
-
94
-
95
-
96
-
97
 |
 |
15
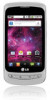
Insert the battery into place by aligning the
3
gold contacts on the phone and the battery.
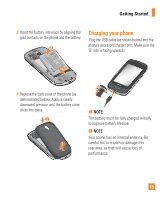
Replace the back cover of the phone (as
4
demonstrated below). Apply a steady
downward pressure until the battery cover
clicks into place.
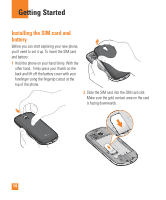
Charging your phone
Plug the USB cable (as shown below) into the
phone's accessory/charger port. Make sure the
‘B’ side is facing upwards.
n
NOTE
The battery must be fully charged initially
to improve battery lifetime.
n
NOTE
Your phone has an internal antenna. Be
careful not to scratch or damage this
rear area, as that will cause loss of
performance.
Getting Started