LG WM2240CW Owner's Manual - Page 28
LG WM2240CW Manual
 |
UPC - 048231011525
View all LG WM2240CW manuals
Add to My Manuals
Save this manual to your list of manuals |
Page 28 highlights
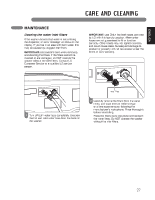
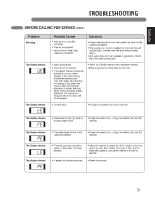
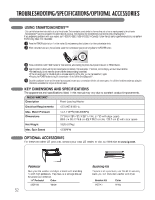
T RO U B L E S H O OT I N G NORMAL SOUNDS YOU MAY HEAR The following sounds may be heard while the washer is operating. They are normal. Clicking: Door lock relay when the door locks and unlocks. Spraying or hissing: Water spraying or circulating during the cycle. Humming or gurgling: Drain pump pumping water from the washer at the end of a cycle. Splashing: Clothes tumbling in the drum during the wash and rinse cycles. ENGLISH BEFORE CALLING FOR SERVICE Your Washer is equipped with an automatic error-monitoring system to detect and diagnose problems at an early stage. If your washer does not function properly or does not function at all, check the following before you call for service. Problem Rattling and clanking noise Thumping sound Possible Causes • Foreign objects, such as keys, coins, or safety pins, may be in drum or pump. • Heavy wash loads may produce a thumping sound. • Washer load may be out of balance. • Shipping bolts and/or packaging materials not removed. • Wash load may be unevenly distributed in the drum. • Not all leveling feet are resting firmly on the floor. • Floor not rigid enough. Solutions • Stop washer and check drum and drain filter for foreign objects. If noise continues after washer is restarted, call for service. • This is normal. If sound continues, washer is probably out of balance. • Stop and redistribute wash load. Vibrating noise • See Installation Instructions for removing shipping bolts and packaging. • Stop washer and rearrange wash load. • Adjust the leveling feet. Make sure all four feet are in firm contact with the floor while the washer is in the spin cycle with a load. • Make sure that the floor is solid and does not flex. Refer to "Flooring" in the Installation section. • Check hoses. Check and tighten hose connections. • Unclog drain pipe. Contact a plumber if necessary. • Reduce detergent amount or use low-sudsing detergent. Only use detergent with the HE (High-Efficiency) logo. • Load the laundry products into the dispenser. • Always remove items from the washer as soon as the cycle is completed. • Always wash dark colors separately from light colors and whites to prevent discoloration. If possible, do not wash heavily soiled items with lightly soiled ones. Water leaking around washer Excessive sudsing • Fill hose connection is loose at tap or washer. • House drain pipes are clogged. • Too much detergent or incorrect detergent. Staining • Laundry products added directly to the washer drum. • Washer not unloaded promptly. • Clothes not sorted properly. 29
-
 1
1 -
2
-
3
-
4
-
5
-
6
-
7
-
8
-
9
-
10
-
11
-
12
-
13
-
14
-
15
-
16
-
17
-
18
-
19
-
20
-
21
-
22
-
 23
23 -
 24
24 -
 25
25 -
 26
26 -
 27
27 -
 28
28 -
 29
29 -
 30
30 -
 31
31 -
 32
32 -
 33
33 -
34
-
35
-
36
-
37
-
38
-
39
-
40
-
41
-
42
-
43
-
44
-
45
-
46
-
47
-
48
-
49
-
50
-
51
-
52
-
53
-
54
-
55
-
56
-
57
-
58
-
59
-
60
-
61
-
62
-
63
-
64
-
65
-
66
-
67
-
68
-
69
-
70
-
71
-
72
-
73
-
74
-
75
-
76
-
77
-
78
-
79
-
80
-
81
-
82
-
83
-
84
-
85
-
86
-
87
-
88
-
89
-
90
-
91
-
92
-
93
-
94
-
95
-
96
-
97
-
98
-
99
-
100
-
101
-
102
-
103
-
104
-
105
-
106
-
107
 |
 |