Lacie 301156U User Manual - Page 19
Formatting for Windows Users, 3.2.1. Formatting from FAT32 to NTFS
 |
UPC - 093053706159
View all Lacie 301156U manuals
Add to My Manuals
Save this manual to your list of manuals |
Page 19 highlights
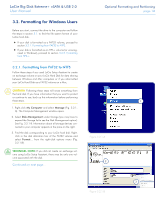
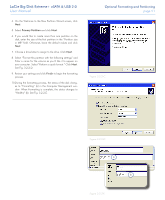
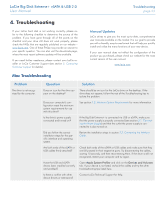
LaCie Big Disk Extreme+ eSATA & USB 2.0 User Manual 3.2. Formatting for Windows Users Before you start, connect the drive to the computer and follow the steps in section 3.1. to find the file system format of your LaCie hard disk. ✦ If your disk is formatted as a FAT32 volume, proceed to section 3.2.1. Formatting from FAT32 to NTFS. ✦ If your disk is formatted as an HFS+ volume (or unrecognized in Windows), proceed to section 3.2.2. Formatting from HFS+. 3.2.1. Formatting from FAT32 to NTFS Follow these steps if you used LaCie Setup Assistant to create an exchange volume on your LaCie Hard Disk for data sharing between Windows and Mac computers or if you reformatted your LaCie Hard Disk as a FAT32 volume on a Mac. CAUTION: Following these steps will erase everything from the hard disk. If you have information that you want to protect or continue to use, back up this information before performing these steps. 1. Right-click My Computer and select Manage (Fig. 3.2.1A). The Computer Management window opens. 2. Select Disk Management under Storage (you may have to expand the Storage list to see the Disk Management option). See Fig. 3.2.1-B. Information about all storage devices connected to your computer appears in the pane on the right. 3. Find the disk corresponding to your LaCie hard disk. Rightclick in the disk allocation bar of the FAT32 volume and select Format... from the right-click options menu (Fig. 3.2.1-B). technical note: If you did not create an exchange volume using LaCie Setup Assistant, there may be only one volume associated with the disk. Continued on next page... Optional Formatting and Partitioning page 18 1 Figure 3.2.1-A 2 3 Figure 3.2.1-B
-
 1
1 -
2
-
3
-
4
-
5
-
6
-
7
-
8
-
9
-
10
-
11
-
12
-
13
-
 14
14 -
 15
15 -
 16
16 -
 17
17 -
 18
18 -
 19
19 -
 20
20 -
 21
21 -
 22
22 -
 23
23 -
 24
24 -
25
-
26
-
27
-
28
-
29
-
30
 |
 |
