Lacie 301496U User Manual - Page 56
Restoring Your Ethernet Disk Using the LaCie Restore CD
 |
UPC - 093053786793
View all Lacie 301496U manuals
Add to My Manuals
Save this manual to your list of manuals |
Page 56 highlights
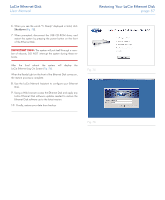
LaCie Ethernet Disk User Manual Restoring Your LaCie Ethernet Disk page 56 14. Restoring Your Ethernet Disk Using the LaCie Restore CD In the event that LaCie Technical Support asks you to restore your Ethernet Disk from CD please use the steps outlined below. IMPORTANT INFO: Restoring will erase all data from the Ethernet Disk; therefore whenever possible backup your data before restoring from CD. 1. Whenever possible first back up the data from the Ethernet Disk, and note down what version of Ethernet Disk software you are using. 2. Connect a monitor to the VGA video port (see section 2.4. Rear Panel), a mouse to either the mouse port (Windows) or one of the Hi-Speed USB 2.0 ports, and optionally a keyboard to either the keyboard port (Windows) or one of the Hi-Speed USB 2.0 ports on the back of the Ethernet Disk. 3. Connect an external USB CD-ROM drive to one of the HiSpeed USB 2.0 ports of the Ethernet Disk. 4. Insert the "Restore CD" and restart the Ethernet Disk. 5. Check that the system is booting from the CD (Fig. 74). TECHNICAL NOTE: If the Ethernet Disk does not boot from the USB CD-ROM drive, Edit the BIOS configuration by pressing the "Del" button at startup and make sure that the "First Boot Device" option is set to "USB-CDROM" in the menu "Advanced BIOS Features". Fig. 74
-
 1
1 -
2
-
3
-
4
-
5
-
6
-
7
-
8
-
9
-
10
-
11
-
12
-
13
-
14
-
15
-
16
-
17
-
18
-
19
-
20
-
21
-
22
-
23
-
24
-
25
-
26
-
27
-
28
-
29
-
30
-
31
-
32
-
33
-
34
-
35
-
36
-
37
-
38
-
39
-
40
-
41
-
42
-
43
-
44
-
45
-
46
-
47
-
48
-
49
-
50
-
 51
51 -
 52
52 -
 53
53 -
 54
54 -
 55
55 -
 56
56 -
 57
57 -
 58
58 -
 59
59 -
 60
60 -
 61
61 -
62
 |
 |
