Lantronix SLP 16 Lantronix SLP - User Guide - Page 12
Installing the Power Input Retention Bracket, Mounting, Horizontal/Rack, Vertical
 |
View all Lantronix SLP 16 manuals
Add to My Manuals
Save this manual to your list of manuals |
Page 12 highlights
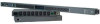
2: Installation Always disconnect the power supply cord before opening to avoid electrical shock. Warning! High leakage current! Earth connection is essential before connecting supply! Warning: 208-240/230V models only: Outlets are not fused. Outlet circuit protection is provided by the building installation, which shall not exceed 30A branch circuit protection Installing the Power Input Retention Bracket For models with a total maximum output < 30A, it may be necessary to install the power input retention bracket prior to mounting the unit within a rack. To install the power input retention bracket: 1. Remove the two screws attaching the IEC 60320 C19 inlet to the enclosure. 2. Assemble and attach the retention bracket to the enclosure as shown: Figure 2-2. Retention Bracket Assembly Mounting Horizontal/Rack 1. Select the appropriate bracket mounting points for proper mounting depth within the rack. 2. Attach the brackets to these mounting points with two screws for each bracket. 3. Install the enclosure into your rack, using the slots in each bracket. The slots allow about ¼ inch of horizontal adaptability to align with the mounting holes of your rack. Vertical 1. Attach the removable flanges to the mount points on the rear of the enclosure using M4 screws. 2. Attach the mounting L-brackets to the flanges with the supplied screws, washers and nut plates. The slots allow about 1½ inches of vertical adaptability. 3. Attach the top and bottom brackets to your rack. SecureLinx SLP Remote Power Manager 11
-
 1
1 -
2
-
3
-
4
-
5
-
6
-
 7
7 -
 8
8 -
 9
9 -
 10
10 -
 11
11 -
 12
12 -
 13
13 -
 14
14 -
 15
15 -
 16
16 -
 17
17 -
18
-
19
-
20
-
21
-
22
-
23
-
24
-
25
-
26
-
27
-
28
-
29
-
30
-
31
-
32
-
33
-
34
-
35
-
36
-
37
-
38
-
39
-
40
-
41
-
42
-
43
-
44
-
45
-
46
-
47
-
48
-
49
-
50
-
51
-
52
-
53
-
54
-
55
-
56
-
57
-
58
-
59
-
60
-
61
-
62
-
63
-
64
-
65
-
66
-
67
-
68
-
69
-
70
-
71
-
72
-
73
-
74
-
75
-
76
-
77
-
78
-
79
-
80
-
81
-
82
-
83
-
84
-
85
-
86
-
87
-
88
-
89
-
90
-
91
-
92
-
93
-
94
-
95
-
96
-
97
-
98
-
99
-
100
-
101
-
102
-
103
-
104
-
105
-
106
-
107
-
108
-
109
 |
 |
