Lantronix XPort XPort - Universal Demo Board Quick Start Guide
Lantronix XPort Manual
 |
View all Lantronix XPort manuals
Add to My Manuals
Save this manual to your list of manuals |
Lantronix XPort manual content summary:
- Lantronix XPort | XPort - Universal Demo Board Quick Start Guide - Page 1
XPort Universal Demo Board Quick Start Part Number 900-559 Revision B February 2013 - Lantronix XPort | XPort - Universal Demo Board Quick Start Guide - Page 2
Document Updated MAC address, part numbers and DeviceInstaller installation information. For the latest revision of this product document, please check our online documentation at www.lantronix.com/support/documentation.html. XPort Universal Demo Board Quick Start 2 - Lantronix XPort | XPort - Universal Demo Board Quick Start Guide - Page 3
Kit Contents 4 What You Need to Know 4 Hardware Address 4 IP Address...4 Connecting an XPort Device 5 Network Method ...5 Serial Method ...5 Install DeviceInstaller...8 Assign an IP Address 8 Configure Your XPort Device 10 XPort ...10 XPort Pro...10 XPort Universal Demo Board Quick Start 3 - Lantronix XPort | XPort - Universal Demo Board Quick Start Guide - Page 4
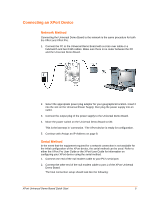
Introduction Thank you for purchasing the XPort Universal Demo Board from Lantronix. This Quick Start describes the procedures for initial connection to the XPort and XPort Pro device through either a network connection or serial port. Once a connection is established you can use the Web Manager or - Lantronix XPort | XPort - Universal Demo Board Quick Start Guide - Page 5
for a network connection is not available for the initial configuration of the XPort device, the serial method can be used. Refer to either the XPort Pro User Guide or the XPort User Guide for information on configuring your XPort device using the serial method. 1. Connect one end of the null modem - Lantronix XPort | XPort - Universal Demo Board Quick Start Guide - Page 6
emulation program to access the CLI. This guide covers accessing the CLI using HyperTerminal. To open HyperTerminal, click StartProgramsAccessoriesCommunicationsHyperTerminal. 4. In the Connection Description window, enter a name for this connection. XPort Universal Demo Board Quick Start 6 - Lantronix XPort | XPort - Universal Demo Board Quick Start Guide - Page 7
per second: 9600 Data Bits: 8 Parity: None Stop Bits: 1 Flow Control: None The COM Port is setup for communication. Refer to either the XPort Pro User Guide or the XPort User Guide for information on configuring your XPort device using the serial method. XPort Universal Demo Board Quick Start 7 - Lantronix XPort | XPort - Universal Demo Board Quick Start Guide - Page 8
a static IP address if you do not want the network to assign an IP address to the XPort Pro or do not have a DHCP server on the network. 4. Click StartAll ProgramsLantronixDeviceInstaller 4.3DeviceInstaller. If your PC has more than one network adapter, a message appears. Select an adapter and - Lantronix XPort | XPort - Universal Demo Board Quick Start Guide - Page 9
gateway blank (all zeros). 9. Click Next. 10. Click Assign and wait several seconds until a confirmation message appears. 11. Click Finish. 12. Select the XPort Pro from the main window list and click ToolsPing. The results appear in the Status area. 13. Click Clear Status to clear the window to - Lantronix XPort | XPort - Universal Demo Board Quick Start Guide - Page 10
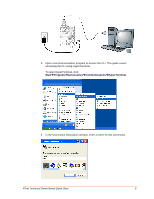
From DeviceInstaller it is easy to start the Lantronix browser-based tool, Web Manager, to configure the XPort device. For detailed information on Web Manager configuration and other methods, see the XPort User Guide or XPort Pro User Guide. XPort 1. In DeviceInstaller, select the unit and then the
-
 1
1 -
 2
2 -
 3
3 -
 4
4 -
 5
5 -
 6
6 -
 7
7 -
8
-
9
-
10
 |
 |

XPort
Universal Demo Board
Quick Start
Part Number 900-559
Revision B
February 2013