Lenovo B350 IdeaCentre B350-B355 Hardware Maintenance Manual - Page 40
springs out as shown., Remove the 2 screws that secure the optical drive to the metal bracket.
 |
View all Lenovo B350 manuals
Add to My Manuals
Save this manual to your list of manuals |
Page 40 highlights
Step 4. Remove the rear cover. Refer to "Removing the rear cover". Step 5. Push down the pin that locks the optical disk drive to the chassis then use the screwdriver push the disk out. 1 2 1 2 Step 6. Push a small iron stick (paper clip) into the small hole on the optical drive cover so that the disk springs out as shown. Step 7. Remove the 2 screws that secure the optical drive to the metal bracket. 1 Step 8. Use a small flat head screwdriver to press and push out the pins that secure the cover to the disk. 2 3 34 IdeaCentre B350-B355Hardware Maintenance Manual
-
 1
1 -
2
-
3
-
4
-
5
-
6
-
7
-
8
-
9
-
10
-
11
-
12
-
13
-
14
-
15
-
16
-
17
-
18
-
19
-
20
-
21
-
22
-
23
-
24
-
25
-
26
-
27
-
28
-
29
-
30
-
31
-
32
-
33
-
34
-
 35
35 -
 36
36 -
 37
37 -
 38
38 -
 39
39 -
 40
40 -
 41
41 -
 42
42 -
 43
43 -
 44
44 -
 45
45 -
46
-
47
-
48
-
49
-
50
-
51
-
52
-
53
-
54
-
55
-
56
-
57
-
58
-
59
-
60
-
61
-
62
-
63
-
64
-
65
-
66
-
67
 |
 |

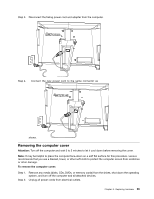
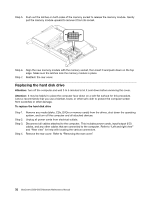
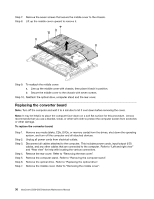
Step 4.
Remove the rear cover. Refer to “Removing the rear cover”.
Step 5.
Push down the pin that locks the optical disk drive to the chassis then use the screwdriver push
the disk out.
1
2
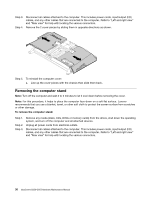
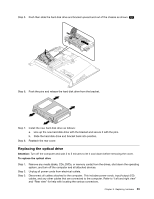
Step 6.
Push a small iron stick (paper clip) into the small hole on the optical drive cover so that the disk
springs out as shown.
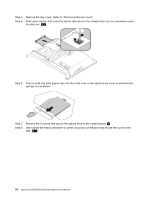
Step 7.
Remove the 2 screws that secure the optical drive to the metal bracket.
1
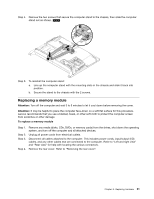
Step 8.
Use a small flat head screwdriver to press and push out the pins that secure the cover to the
disk.
2
3
34
IdeaCentre B350–B355Hardware Maintenance Manual