Lenovo Horizon 2e Table PC Lenovo HORIZON 2e All-In-One PC Hardware Maintenanc - Page 37
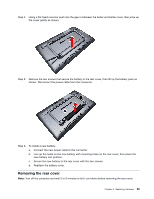
shown. The front panel and the rear cover are pinned together, work around the edge as shown
 |
View all Lenovo Horizon 2e Table PC manuals
Add to My Manuals
Save this manual to your list of manuals |
Page 37 highlights
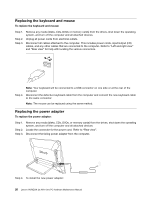
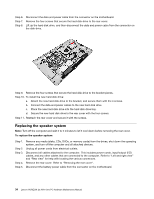
Step 6. For the below procedure, it might requiring using a flat head crowbar 1 or a boot disk 2 . Step 7. Put the head of crowbar or boot disk into the slot in between the panel and the rear cover as shown. The front panel and the rear cover are pinned together, work around the edge as shown, then prise the rear cover away from the panel. Chapter 8. Replacing hardware 31
-
 1
1 -
2
-
3
-
4
-
5
-
6
-
7
-
8
-
9
-
10
-
11
-
12
-
13
-
14
-
15
-
16
-
17
-
18
-
19
-
20
-
21
-
22
-
23
-
24
-
25
-
26
-
27
-
28
-
29
-
30
-
31
-
 32
32 -
 33
33 -
 34
34 -
 35
35 -
 36
36 -
 37
37 -
 38
38 -
 39
39 -
 40
40 -
 41
41 -
 42
42 -
43
-
44
-
45
-
46
-
47
-
48
-
49
-
50
-
51
-
52
-
53
-
54
-
55
 |
 |

Step 6.
For the below procedure, it might requiring using a flat head crowbar
1
or a boot disk
2
.
Step 7.
Put the head of crowbar or boot disk into the slot in between the panel and the rear cover as
shown. The front panel and the rear cover are pinned together, work around the edge as shown,
then prise the rear cover away from the panel.
Chapter 8
.
Replacing hardware
31