Lenovo IdeaCentre B520e Lenovo IdeaCentre B5 Series Hardware Replacement Manua - Page 22
Replacing the hard disk drive
 |
View all Lenovo IdeaCentre B520e manuals
Add to My Manuals
Save this manual to your list of manuals |
Page 22 highlights
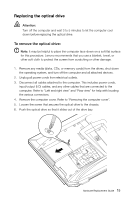
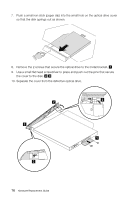
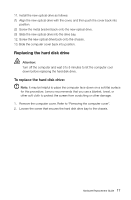
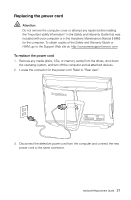
11. Install the new optical drive as follows: (1) Align the new optical drive with the cover, and then push the cover back into position. (2) Screw the metal bracket back onto the new optical drive. (3) Slide the new optical drive into the drive bay. 12. Screw the new optical drive back onto the chassis. 13. Slide the computer cover back into position. Replacing the hard disk drive Attention: Turn off the computer and wait 3 to 5 minutes to let the computer cool down before replacing the hard disk drive. To replace the hard disk drive: Note: It may be helpful to place the computer face-down on a soft flat surface for this procedure. Lenovo recommends that you use a blanket, towel, or other soft cloth to protect the screen from scratching or other damage. 1. Remove the computer cover. Refer to "Removing the computer cover". 2. Loosen the screw that secures the hard disk drive bay to the chassis. Hardware Replacement Guide 17
-
 1
1 -
2
-
3
-
4
-
5
-
6
-
7
-
8
-
9
-
10
-
11
-
12
-
13
-
14
-
15
-
16
-
 17
17 -
 18
18 -
 19
19 -
 20
20 -
 21
21 -
 22
22 -
 23
23 -
 24
24 -
 25
25 -
 26
26 -
 27
27 -
28
-
29
 |
 |
