Lenovo J200 (English) Hardware replacement guide - Page 21
Installing, options, replacing, hardware
 |
View all Lenovo J200 manuals
Add to My Manuals
Save this manual to your list of manuals |
Page 21 highlights
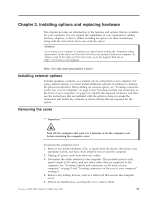
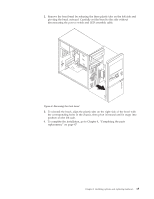
Chapter 3. Installing options and replacing hardware This chapter provides an introduction to the features and options that are available for your computer. You can expand the capabilities of your computer by adding memory, adapters, or drives. When installing an option, use these instructions along with the instructions that come with the option. Attention Do not open your computer or attempt any repair before reading the "Important safety information" in the Safety and Warranty Guide that was included with your computer. To obtain a copy of the Safety and Warranty Guide, go to the Support Web site at http://www.lenovo.com/support. Note: Use only parts provided by Lenovo. Installing external options External speakers, a printer, or a scanner can be connected to your computer. For some external options, you must install additional software in addition to making the physical connection. When adding an external option, see "Locating connectors on the rear of your computer" on page 6 and "Locating controls and connectors on the front of your computer" on page 5 to identify the required connector, and then use the instructions that are included with the option to help you make the connection and install any software or device drivers that are required for the option. Removing the cover Important Turn off the computer and wait 3 to 5 minutes to let the computer cool before removing the computer cover. To remove the computer cover: 1. Remove any media (diskettes, CDs, or tapes) from the drives, shut down your operating system, and turn off all attached devices and the computer. 2. Unplug all power cords from electrical outlets. 3. Disconnect the cables attached to the computer. This includes power cords, input/output (I/O) cables, and any other cables that are connected to the computer. See "Locating controls and connectors on the front of your computer" on page 5 and "Locating connectors on the rear of your computer" on page 6. 4. Remove any locking devices, such as a cable lock that secures the computer cover. 5. If there are thumbscrews securing the cover, remove them. © Lenovo 2005, 2007. Portions © IBM Corp. 2005. 13
-
 1
1 -
2
-
3
-
4
-
5
-
6
-
7
-
8
-
9
-
10
-
11
-
12
-
13
-
14
-
15
-
 16
16 -
 17
17 -
 18
18 -
 19
19 -
 20
20 -
 21
21 -
 22
22 -
 23
23 -
 24
24 -
 25
25 -
 26
26 -
27
-
28
-
29
-
30
-
31
-
32
-
33
-
34
-
35
-
36
-
37
-
38
-
39
-
40
-
41
-
42
-
43
-
44
-
45
-
46
-
47
-
48
-
49
-
50
-
51
-
52
-
53
-
54
-
55
-
56
-
57
-
58
-
59
-
60
-
61
-
62
-
63
-
64
-
65
-
66
 |
 |