Lenovo K4450 Laptop Hardware Maintenance Manual - Lenovo K4450 and K4450A - Page 57
Hard disk drive assembly, dataorprogramscanbeoverwritten., Removethescrews, andthenpullthetab
 |
View all Lenovo K4450 Laptop manuals
Add to My Manuals
Save this manual to your list of manuals |
Page 57 highlights
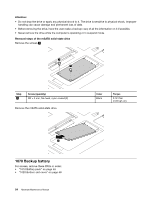
1040 Hard disk drive assembly For access, remove these FRUs in order: • "1010 Battery pack" on page 48 • "1020 Bottom slot cover" on page 48 Important notice for replacing a hard disk drive Always try to run a low-level format before replacing a hard disk drive. This will cause all customer data on the hard disk drive to be lost. Ensure that the customer has a current backup of the data before doing this task. Attention: • Do not drop the drive or apply any physical shock to it. The drive is sensitive to physical shock. Improper handling can cause damage and permanent loss of data. • Before removing the drive, have the user make a backup copy of all the information on it if possible. • Never remove the drive while the computer is operating or in suspend mode. • The drive startup sequence in the computer you are servicing might have been changed. Be extremely careful during write operations such as copying, saving, or formatting. If you select an incorrect drive, data or programs can be overwritten. Removal steps of the hard disk drive assembly Remove the screws 1 , and then pull the tab 2 . 1 2 1 Step 1 Screw (quantity) M2 × 3 mm, flat-head, nylon-coated (2) Color Black Torque 0.181 Nm (1.85 kgf-cm) Chapter 8. Removing or replacing a FRU 51
-
 1
1 -
2
-
3
-
4
-
5
-
6
-
7
-
8
-
9
-
10
-
11
-
12
-
13
-
14
-
15
-
16
-
17
-
18
-
19
-
20
-
21
-
22
-
23
-
24
-
25
-
26
-
27
-
28
-
29
-
30
-
31
-
32
-
33
-
34
-
35
-
36
-
37
-
38
-
39
-
40
-
41
-
42
-
43
-
44
-
45
-
46
-
47
-
48
-
49
-
50
-
51
-
 52
52 -
 53
53 -
 54
54 -
 55
55 -
 56
56 -
 57
57 -
 58
58 -
 59
59 -
 60
60 -
 61
61 -
 62
62 -
63
-
64
-
65
-
66
-
67
-
68
-
69
-
70
-
71
-
72
-
73
-
74
-
75
-
76
-
77
-
78
-
79
-
80
-
81
-
82
-
83
-
84
-
85
-
86
-
87
-
88
 |
 |
