Lenovo L2262 Wide Flat Panel Monitor Lenovo L2262 Wide Flat Panel Monitor User - Page 6
Attaching the base and handling your monitor, Product overview, Adjusting the tilt, Swivel
 |
View all Lenovo L2262 Wide Flat Panel Monitor manuals
Add to My Manuals
Save this manual to your list of manuals |
Page 6 highlights
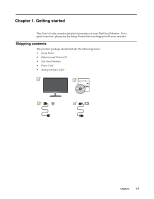
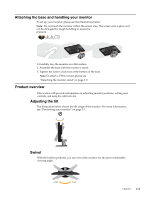
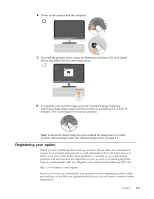
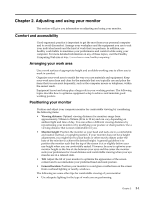
Attaching the base and handling your monitor To set up your monitor, please see the illustrations below. Note: Do not touch the monitor within the screen area. The screen area is glass and can be damaged by rough handling or excessive pressure. 1.Carefully lays the monitor on a flat surface. 2.Assemble the base with the monitor's stand. 3.Tighten the screws clockwise at the bottom of the base. Note:To attach a VESA mount, please see "Detaching the monitor stand" on page 2-9. Product overview This section will provide information on adjusting monitor positions, setting user controls, and using the cable lock slot. Adjusting the tilt The illustration below shows the tilt range of the monitor. For more information, see "Positioning your monitor" on page 2-1. -5 20 Swivel With the built-in pedestal, you can swivel the monitor for the most comfortable viewing angle. -150o 150o Chapter 1. 1-2
-
 1
1 -
 2
2 -
 3
3 -
 4
4 -
 5
5 -
 6
6 -
 7
7 -
 8
8 -
 9
9 -
 10
10 -
 11
11 -
 12
12 -
13
-
14
-
15
-
16
-
17
-
18
-
19
-
20
-
21
-
22
-
23
-
24
-
25
-
26
-
27
-
28
-
29
 |
 |
