Lenovo ThinkPad 600X TP 600E User's Reference - Page 99
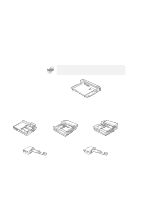
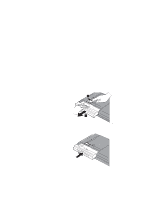
Enabling the IDE Drive on the Docking Station
 |
View all Lenovo ThinkPad 600X manuals
Add to My Manuals
Save this manual to your list of manuals |
Page 99 highlights
Using a Docking Station 3 Set the jumper or the DIP switches on the adapter card. For an IDE device such as a hard disk drive or a CD-ROM drive: * Before you do the following steps, read "Enabling the IDE Drive * on the Docking Station" * 1 Start the ThinkPad Configuration program and click on the Docking Station ( ) button. > 2 Click on the IDE Device tab. > 3 Select Enable in the UltraslimBay IDE device in the > Docking Station list box (if you haven't already), and > restart the computer. 4 Click on Device Manager and check whether there is a resource conflict between the new IDE device and the other devices in the computer. If there is a resource conflict, see the Online User's Guide. Enabling the IDE Drive on the Docking Station If you have installed an IDE device (such as a hard disk drive or a CD-ROM drive) in the docking station, you must change the setting on your computer to enable the device. By default, your computer uses the primary IDE channel for the primary hard disk drive (Primary-Master) and the secondary IDE channel for a device in the UltraslimBay (Secondary-Master). You cannot use the IDE device in the docking station in this default 2-channel default IDE mode. To enable an IDE device in the docking station, you must change the default setting to either of the following: 3-channel IDE mode. In this mode, you can still use the hot * and warm swap functions for a device in the UltraslimBay. An additional IRQ for the third IDE channel is required. 2-channel IDE mode. In this mode, you do not have to assign an extra IRQ. However, you cannot use hot and warm swap * functions for a device in the UltraslimBay. Chapter 2. Extending the Features of Your Computer 85
-
 1
1 -
2
-
3
-
4
-
5
-
6
-
7
-
8
-
9
-
10
-
11
-
12
-
13
-
14
-
15
-
16
-
17
-
18
-
19
-
20
-
21
-
22
-
23
-
24
-
25
-
26
-
27
-
28
-
29
-
30
-
31
-
32
-
33
-
34
-
35
-
36
-
37
-
38
-
39
-
40
-
41
-
42
-
43
-
44
-
45
-
46
-
47
-
48
-
49
-
50
-
51
-
52
-
53
-
54
-
55
-
56
-
57
-
58
-
59
-
60
-
61
-
62
-
63
-
64
-
65
-
66
-
67
-
68
-
69
-
70
-
71
-
72
-
73
-
74
-
75
-
76
-
77
-
78
-
79
-
80
-
81
-
82
-
83
-
84
-
85
-
86
-
87
-
88
-
89
-
90
-
91
-
92
-
93
-
 94
94 -
 95
95 -
 96
96 -
 97
97 -
 98
98 -
 99
99 -
 100
100 -
 101
101 -
 102
102 -
 103
103 -
 104
104 -
105
-
106
-
107
-
108
-
109
-
110
-
111
-
112
-
113
-
114
-
115
-
116
-
117
-
118
-
119
-
120
-
121
-
122
-
123
-
124
-
125
-
126
-
127
-
128
-
129
-
130
-
131
-
132
-
133
-
134
-
135
-
136
-
137
-
138
-
139
-
140
-
141
-
142
-
143
-
144
-
145
-
146
-
147
-
148
-
149
-
150
-
151
-
152
-
153
-
154
-
155
-
156
-
157
-
158
-
159
-
160
-
161
-
162
-
163
-
164
-
165
-
166
-
167
-
168
-
169
-
170
-
171
-
172
-
173
-
174
-
175
-
176
-
177
-
178
-
179
-
180
-
181
-
182
-
183
-
184
-
185
-
186
-
187
-
188
-
189
-
190
-
191
 |
 |
