Lenovo ThinkPad R40 Hardware Maintenance Manual - Page 112
servicing.
 |
View all Lenovo ThinkPad R40 manuals
Add to My Manuals
Save this manual to your list of manuals |
Page 112 highlights
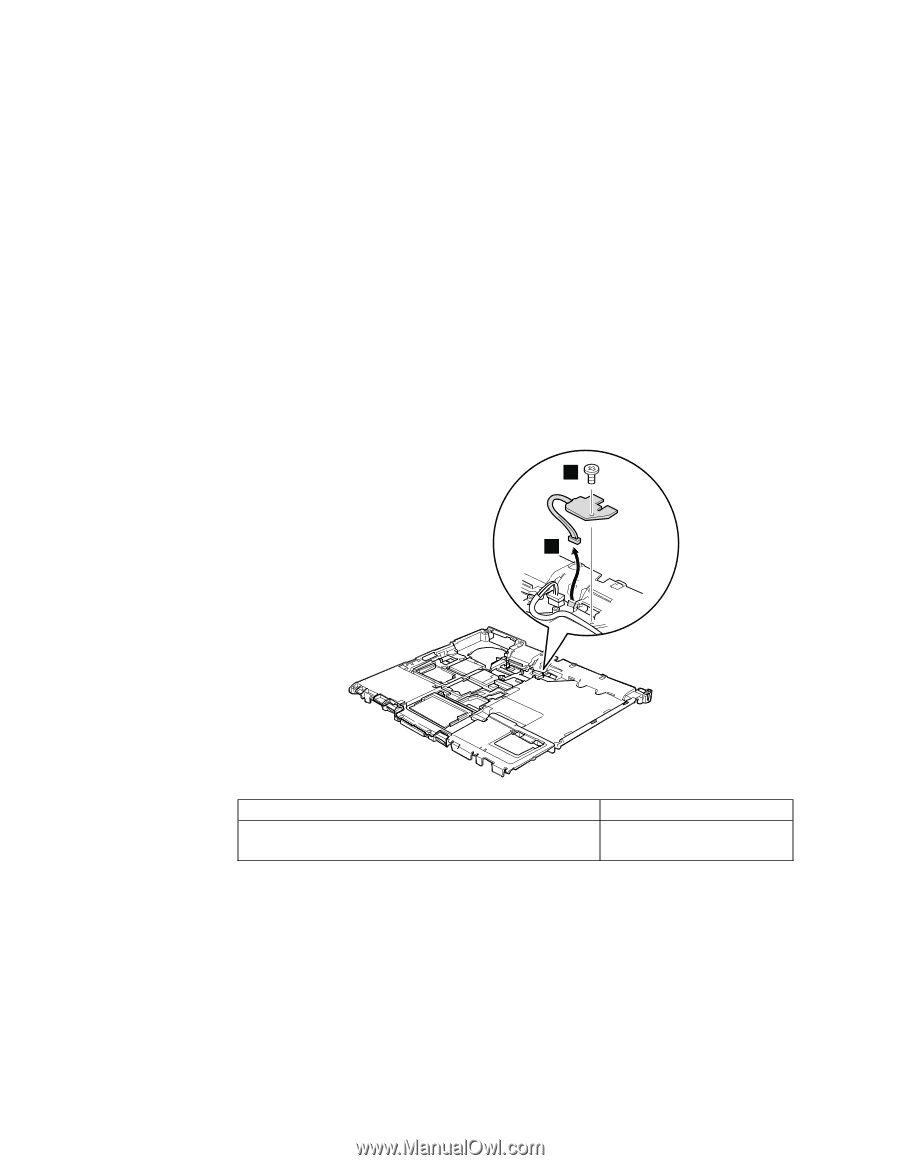
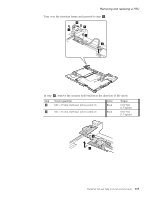
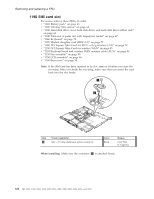
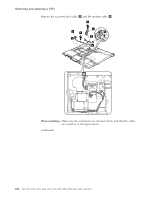
Removing and replacing a FRU 1190 SIM card slot For access, remove these FRUs, in order: v "1010 Battery pack" on page 63 v "1020 Ultrabay Slim device" on page 64 v "1030 Hard disk drive cover, hard disk drive, and hard disk drive rubber rails" on page 65 v "1040 Palm rest or palm rest with fingerprint reader" on page 67 v "1060 Keyboard" on page 75 v "1070 Modem daughter card (MDC-1.5)" on page 77 v "1080 PCI Express Mini Card for 802.11 a/b/g wireless LAN" on page 79 v "1100 PCI Express Mini Card for wireless WAN" on page 83 v "1120 Keyboard bezel and wireless WAN antenna cable (AUX)" on page 86 v "1130 Fan assembly" on page 89 v "1150 LCD assembly" on page 94 v "1160 Base cover" on page 98 Note: If the SIM card has been inserted in its slot, remove it before you start the servicing. After you finish the servicing, make sure that you insert the card back into the slot firmly. 1 2 Step 1 Screw (quantity) M2 × 3.5 mm, flat-head, nylon-coated (1) Color Black Torque 0.167 Nm (1.7 kgfcm) When installing: Make sure the connector 2 is attached firmly. 106 MT 1951, 1952, 1953, 1954, 1955, 1956, 2007, 2008, 2009, 2613, 2623, and 2637
-
 1
1 -
2
-
3
-
4
-
5
-
6
-
7
-
8
-
9
-
10
-
11
-
12
-
13
-
14
-
15
-
16
-
17
-
18
-
19
-
20
-
21
-
22
-
23
-
24
-
25
-
26
-
27
-
28
-
29
-
30
-
31
-
32
-
33
-
34
-
35
-
36
-
37
-
38
-
39
-
40
-
41
-
42
-
43
-
44
-
45
-
46
-
47
-
48
-
49
-
50
-
51
-
52
-
53
-
54
-
55
-
56
-
57
-
58
-
59
-
60
-
61
-
62
-
63
-
64
-
65
-
66
-
67
-
68
-
69
-
70
-
71
-
72
-
73
-
74
-
75
-
76
-
77
-
78
-
79
-
80
-
81
-
82
-
83
-
84
-
85
-
86
-
87
-
88
-
89
-
90
-
91
-
92
-
93
-
94
-
95
-
96
-
97
-
98
-
99
-
100
-
101
-
102
-
103
-
104
-
105
-
106
-
 107
107 -
 108
108 -
 109
109 -
 110
110 -
 111
111 -
 112
112 -
 113
113 -
 114
114 -
 115
115 -
 116
116 -
 117
117 -
118
-
119
-
120
-
121
-
122
-
123
-
124
-
125
-
126
-
127
-
128
-
129
-
130
-
131
-
132
-
133
-
134
-
135
-
136
-
137
-
138
-
139
-
140
-
141
-
142
-
143
-
144
-
145
-
146
-
147
-
148
-
149
-
150
-
151
-
152
-
153
-
154
-
155
-
156
-
157
-
158
-
159
-
160
-
161
-
162
-
163
-
164
-
165
-
166
-
167
-
168
-
169
-
170
-
171
-
172
-
173
-
174
-
175
-
176
-
177
-
178
-
179
-
180
-
181
-
182
-
183
-
184
-
185
-
186
-
187
-
188
-
189
-
190
-
191
-
192
-
193
-
194
-
195
-
196
-
197
-
198
-
199
-
200
-
201
-
202
-
203
-
204
-
205
-
206
-
207
-
208
-
209
-
210
-
211
-
212
-
213
-
214
-
215
-
216
-
217
-
218
-
219
-
220
-
221
-
222
-
223
-
224
-
225
-
226
 |
 |