Lenovo ThinkVision LT1423p 13.3-inch IPS LED Backlit LCD Wireless Touch Monitor - Page 13
If a message is displayed indicating that the battery is less than 10% it is
 |
View all Lenovo ThinkVision LT1423p 13.3-inch IPS LED Backlit LCD Wireless Touch Monitor with pen manuals
Add to My Manuals
Save this manual to your list of manuals |
Page 13 highlights
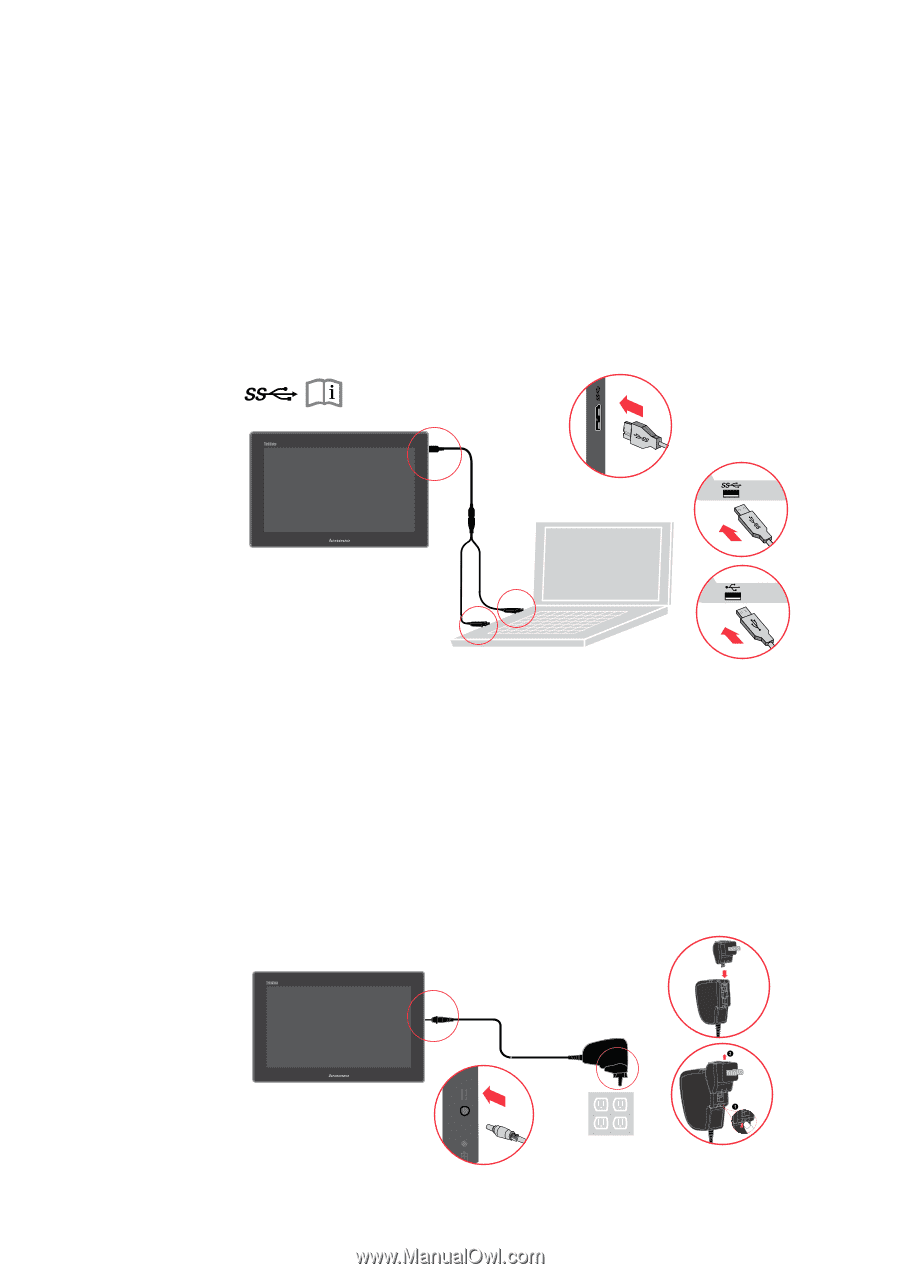
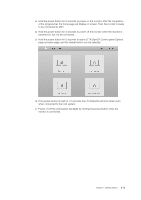
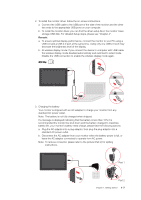
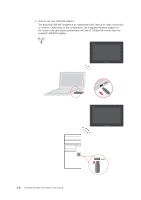
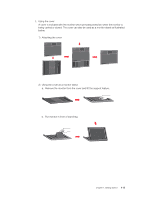
2. To install the monitor driver, follow the on-screen instructions. a. Connect the USB cable to the USB port of the side of the monitor and the other two ends to the appropriate USB ports on your computer. b. To install the monitor driver, you can find the driver setup file in the monitor mass storage USB disk. For detailed Setup steps, please see "Chapter 4". Remark: a. To ensure optimal display performance, connect the monitor to your PC using a USB 3.0 and a USB 2.0 port at the same time. Using only one USB 2.0 port may decrease the brightness level of the display. b. At wireless display mode: If you connect the device to computer with USB cable, the wireless display mode disabled automatically and switched to wired mode. Disable the USB connection to enable the wireless display mode again. 3. Charging the battery Your monitor is shipped with an AC adapter to charge your monitor from any standard AC power outlet. Note: The battery is not fully charged when shipped. If a message is displayed indicating that the battery is less than 10% it is recommended the monitor be shut down and the battery charged to maximize battery life. your monitor's battery need charge, please take the following actions: a. Plug the AC adapter into a plug adaptor, then plug the plug adaptor into a standard AC power outlet. b. Disconnect the AC adapter from your monitor when the battery power is full, or leave the AC adapter connected to operate from AC power. Note: To remove connector, please refer to the picture (Part 2) for spliting instructions. Part 1 Part 2 Chapter 1. Getting started 1-7
-
 1
1 -
2
-
3
-
4
-
5
-
6
-
7
-
 8
8 -
 9
9 -
 10
10 -
 11
11 -
 12
12 -
 13
13 -
 14
14 -
 15
15 -
 16
16 -
 17
17 -
 18
18 -
19
-
20
-
21
-
22
-
23
-
24
-
25
-
26
-
27
-
28
-
29
-
30
-
31
-
32
-
33
-
34
-
35
-
36
-
37
-
38
-
39
-
40
-
41
-
42
-
43
-
44
-
45
-
46
-
47
-
48
-
49
-
50
-
51
-
52
-
53
-
54
-
55
-
56
-
57
-
58
-
59
-
60
-
61
-
62
-
63
-
64
-
65
-
66
-
67
-
68
-
69
-
70
-
71
-
72
-
73
-
74
-
75
-
76
-
77
-
78
-
79
-
80
-
81
-
82
-
83
-
84
-
85
-
86
 |
 |