LevelOne KVM-0410 Manual - Page 6
Pushbuttons, OSD On-Screen-Display Operation
 |
View all LevelOne KVM-0410 manuals
Add to My Manuals
Save this manual to your list of manuals |
Page 6 highlights
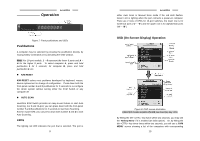
LevelOne Operation Figure 7: Front pushbuttons and LEDs Pushbuttons A computer may be selected by pressing the pushbutton directly, by issuing hotkey commands or by activating the OSD window. Note: For 16-port models: 1 ~ 8 represent the lower 8 ports and A ~ H for the higher 8 ports. To select computer A, press and hold pushbutton 1 for 2 seconds; for computer B, press and hold pushbutton 2, etc. ! K/M RESET K/M RESET solves most problems developed by keyboard, mouse, device replacement or change of configuration. Press down both the front-panel number 1 and 2 pushbuttons for 2 seconds to re-configure the whole system without turning either the KVM Switch or any computer off. ! AUTO SCAN LevelOne KVM Switch provides an easy-to-use feature to start Auto Scanning. For 8 and 16-port, you can press down both the front-panel number 7 and 8 pushbuttons for 2 seconds to start Auto Scanning. And for 4-port KVM, you can press down both number 3 and 4 to start Auto Scanning. LEDs The lighting red LED indicates the port that is selected. The port is 9 LevelOne either Auto Scan or Manual Scan mode if the red LED flashes. Green LED is lighting when the port connects a power-on computer. There are 2 rows of LEDs for 16-port switches, the lower row is for numerical ports ("1" ~ "8") and the upper row is for alphabetical ports ("A" ~ "B"). OSD (On-Screen-Display) Operation Figure 8: OSD screen illustration USB-PS/2 Combo models offer F5, see Function key By hitting the left key twice within two seconds, you may see the 'Hotkey Menu' if it is enabled (an OSD option). Or, by hitting the left key three times within two seconds, you will see a 'KVM MENU' screen showing a list of the computers with corresponding 10
-
 1
1 -
 2
2 -
 3
3 -
 4
4 -
 5
5 -
 6
6 -
 7
7 -
 8
8 -
 9
9 -
 10
10 -
 11
11 -
 12
12 -
13
-
14
-
15
-
16
-
17
 |
 |
