LevelOne KVM-0410 Manual - Page 7
Release 7 and 8, then release 1
 |
View all LevelOne KVM-0410 manuals
Add to My Manuals
Save this manual to your list of manuals |
Page 7 highlights
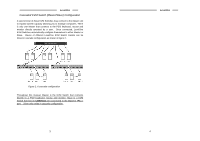
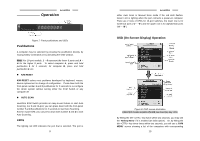
LevelOne port numbers, names and status, see figure 8. The port number of the currently selected computer is displayed in red, same as the front indicator, at the upper-right corner of the OSD menu. The color of a device name is green if it has power and is ready for operation, or white as it has no power. OSD menu updates the color when it is activated. For 16-port models, pressing the and keys to view 8 other computers. Use the 1" ~ "8" or "A" ~ "H" to highlight a computer and the key to select it. Or, you may press to exit OSD and remove the OSD menu from the display; the status window returns to the display and indicates the currently selected computer or operating status. A triangle mark (!) to the right of a name indicates the port is cascaded to a Slave; the number at the left of the triangle mark shows the number of ports the Slave has, i.e. 8!for an 8-port Switch. key brings you one level down and another screen pops up listing the names of the computers on that Slave. The name of the Slave will be shown at the upper right corner of the OSD menu. It is useful to group computers and still be able to see the group name. An eye mark (") on the right of a name indicates that computer is selected and monitored in Scan mode. In OSD, this mark can be switched on or off by function key . Press key to exit OSD and to return to the selected computer; the computer name is also shown on the screen. #Function key : To edit name entry of a computer or a Slave with up to 14 characters for 8- or 16-port models, and 8 characters for 4-port models. First, highlight a port then press followed by name entry. Valid characters are 'A'~'Z', '0'~'9' and the dash character. Lowercase letters are converted to uppercase ones. Press to delete a letter one at a time. Non-volatile memory stores all name entries until you change, even if the unit is powered down. 11 LevelOne #Function key : To switch the eye mark (") of a computer on or off. First, use the and arrow keys to highlight it, then press to switch its eye mark on or off. If Scan Type is 'Ready PC +"', only the power-on and eye mark selected computers will be displayed sequentially in Scan mode. #Function key : To lock a computer from unauthorized access. To lock a device, highlight it then press . Now, enter up to 4 characters ('A'~'Z', '0'~'9, '-') followed by as new password. A Security-enabled device is marked with a lock ($) following its port number. To permanently disable the security function from a locked device, highlight it, press then enter the password. For 4-port models, only one port can be password secured. If you want to access the locked device temporarily, simply highlight it and press , the OSD will ask you for the password. After entering the correct password, you are allowed to use the device. This device is automatically re-locked once you switch to another port. During Scan mode, OSD skips the password-protected devices. If you forget the password, the only way to permanently erase all the passwords is to: (for 8- and 16-port switches) Press and hold the front panel buttons "1" and "2", then hold "7" and "8". Release "7" and "8", then release "1" and "2". For 4-port KVM switches: If you forget the password, the only way to permanently disable the security function is to remove all possible power sources from the master KVM switch. You need to turn off all computers and unplug the power adapter, then restart everything. #Function key : More functions are available by hitting . A new screen pops up displaying more functions as described below. Most of them are marked with a triangle (!) indicating there are options to choose from. Using the and arrow keys, select the functions and press 12
-
 1
1 -
 2
2 -
 3
3 -
 4
4 -
 5
5 -
 6
6 -
 7
7 -
 8
8 -
 9
9 -
 10
10 -
 11
11 -
 12
12 -
13
-
14
-
15
-
16
-
17
 |
 |
