Lexmark 16Z0000 User's Guide - Page 136
Experiencing poor quality or incorrect output, Checking the port setting
 |
UPC - 734646046657
View all Lexmark 16Z0000 manuals
Add to My Manuals
Save this manual to your list of manuals |
Page 136 highlights
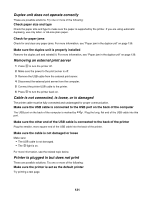
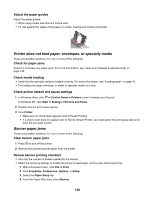
Make sure the printer is receiving power If the button is not lit, the printer may not be receiving power. • Plug the printer into a different outlet. • If the printer is plugged into a surge protector, unplug the printer, and plug it directly into an electrical outlet. Make sure the external print server is working If the printer is connected to an external print server, the problem may be with this print server. Check to make sure the device is working properly and that the printer is connected to the network. Experiencing poor quality or incorrect output See the topic that best describes the problem. • Print is too dark or smudged • Vertical straight lines are not smooth • White lines appear in graphics or solid black areas • Characters are missing or unexpected • Colors on printout are faded or differ from colors on the screen • Printouts have alternating bands of light and dark print • Page prints with different fonts • Printed characters are improperly formed or are not aligned correctly at the left margin • Transparencies or photos contain white lines • Glossy photo paper or transparencies stick together Checking the port setting 1 Click Start Œ Settings Œ Printers or Printers and Faxes. 2 Right-click the Lexmark 4800 Series icon. 3 From the sidebar menu, select Properties. 4 Click the Details tab if you are using Windows 98/Me, or click the Ports tab if you are using Windows 2000 or Windows XP. 5 Make sure: • The port is set to a USB port. • File is not set as the port. Jams and misfeeds troubleshooting How to clear and avoid paper jams To clear the paper path: 1 Pull firmly on the paper to remove it. If you cannot reach the paper because it is too far into the printer, lift the scanner unit to open the printer. 2 Pull the paper out. 3 Close the scanner unit. 136
-
 1
1 -
2
-
3
-
4
-
5
-
6
-
7
-
8
-
9
-
10
-
11
-
12
-
13
-
14
-
15
-
16
-
17
-
18
-
19
-
20
-
21
-
22
-
23
-
24
-
25
-
26
-
27
-
28
-
29
-
30
-
31
-
32
-
33
-
34
-
35
-
36
-
37
-
38
-
39
-
40
-
41
-
42
-
43
-
44
-
45
-
46
-
47
-
48
-
49
-
50
-
51
-
52
-
53
-
54
-
55
-
56
-
57
-
58
-
59
-
60
-
61
-
62
-
63
-
64
-
65
-
66
-
67
-
68
-
69
-
70
-
71
-
72
-
73
-
74
-
75
-
76
-
77
-
78
-
79
-
80
-
81
-
82
-
83
-
84
-
85
-
86
-
87
-
88
-
89
-
90
-
91
-
92
-
93
-
94
-
95
-
96
-
97
-
98
-
99
-
100
-
101
-
102
-
103
-
104
-
105
-
106
-
107
-
108
-
109
-
110
-
111
-
112
-
113
-
114
-
115
-
116
-
117
-
118
-
119
-
120
-
121
-
122
-
123
-
124
-
125
-
126
-
127
-
128
-
129
-
130
-
 131
131 -
 132
132 -
 133
133 -
 134
134 -
 135
135 -
 136
136 -
 137
137 -
 138
138 -
 139
139 -
 140
140 -
 141
141 -
142
-
143
-
144
-
145
-
146
-
147
-
148
-
149
-
150
-
151
-
152
-
153
-
154
-
155
-
156
-
157
-
158
-
159
-
160
-
161
-
162
-
163
-
164
-
165
-
166
-
167
-
168
-
169
-
170
-
171
-
172
-
173
-
174
-
175
-
176
 |
 |