Lexmark 21Z0300 User Guide - Page 163
Solving print quality problems
 |
UPC - 734646048965
View all Lexmark 21Z0300 manuals
Add to My Manuals
Save this manual to your list of manuals |
Page 163 highlights
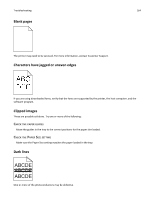
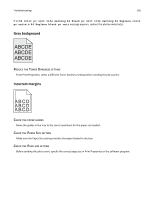
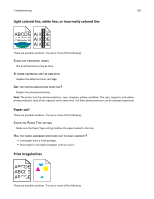
Troubleshooting 163 3 Press until Setup Menu appears, and then press . 4 Press until Print Recovery appears, and then press . 5 Press until Jam Recovery appears, and then press . 6 Press until On or Auto appears, and then press . Solving print quality problems The information in the following topics may help you solve print quality problems. If these suggestions do not correct the problem, contact Customer Support. You may have a printer part that requires adjustment or replacement. Isolating print quality problems To help isolate print quality problems, print the print quality test pages: 1 Turn the printer off. 2 Load letter‑ or A4‑size paper in the tray in the long‑edge orientation. 3 From the control panel, press and hold and while turning the printer on. 4 Release both buttons when Performing Self Test appears. The printer performs its power‑on sequence, and then Config Menu appears. 5 Press until Prt Quality Pgs appears, and then press . The pages are formatted. Printing Quality Test Pages appears, and then the pages print. The message remains on the display until all the pages print. 6 After the print quality test pages print, press until Exit Config Menu appears, and then press .
-
 1
1 -
2
-
3
-
4
-
5
-
6
-
7
-
8
-
9
-
10
-
11
-
12
-
13
-
14
-
15
-
16
-
17
-
18
-
19
-
20
-
21
-
22
-
23
-
24
-
25
-
26
-
27
-
28
-
29
-
30
-
31
-
32
-
33
-
34
-
35
-
36
-
37
-
38
-
39
-
40
-
41
-
42
-
43
-
44
-
45
-
46
-
47
-
48
-
49
-
50
-
51
-
52
-
53
-
54
-
55
-
56
-
57
-
58
-
59
-
60
-
61
-
62
-
63
-
64
-
65
-
66
-
67
-
68
-
69
-
70
-
71
-
72
-
73
-
74
-
75
-
76
-
77
-
78
-
79
-
80
-
81
-
82
-
83
-
84
-
85
-
86
-
87
-
88
-
89
-
90
-
91
-
92
-
93
-
94
-
95
-
96
-
97
-
98
-
99
-
100
-
101
-
102
-
103
-
104
-
105
-
106
-
107
-
108
-
109
-
110
-
111
-
112
-
113
-
114
-
115
-
116
-
117
-
118
-
119
-
120
-
121
-
122
-
123
-
124
-
125
-
126
-
127
-
128
-
129
-
130
-
131
-
132
-
133
-
134
-
135
-
136
-
137
-
138
-
139
-
140
-
141
-
142
-
143
-
144
-
145
-
146
-
147
-
148
-
149
-
150
-
151
-
152
-
153
-
154
-
155
-
156
-
157
-
 158
158 -
 159
159 -
 160
160 -
 161
161 -
 162
162 -
 163
163 -
 164
164 -
 165
165 -
 166
166 -
 167
167 -
 168
168 -
169
-
170
-
171
-
172
-
173
-
174
-
175
-
176
-
177
-
178
-
179
-
180
-
181
-
182
-
183
-
184
-
185
-
186
-
187
-
188
-
189
-
190
-
191
-
192
-
193
 |
 |