Lexmark C3426 Users Guide PDF - Page 31
Checking the printer connectivity, Configuring the SMTP server, Printing the Menu Settings
 |
View all Lexmark C3426 manuals
Add to My Manuals
Save this manual to your list of manuals |
Page 31 highlights
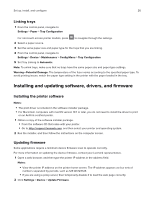
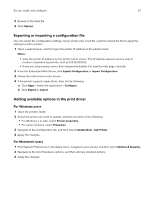
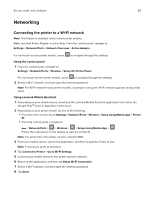
Set up, install, and configure 31 Checking the printer connectivity 1 Print the Network Setup Page. From the control panel, navigate to: Settings > Reports > Network > Network Setup Page For non-touch-screen printer models, press to navigate through the settings. 2 Check the first section of the page and confirm that the status is connected. If the status is not connected, then the LAN drop may be inactive or the network cable may be unplugged or malfunctioning. Contact your administrator for assistance. Configuring the SMTP server Note: In some printer models, this setting can be configured only from the Embedded Web Server. From the control panel 1 From the control panel, navigate to: Settings > Device > Notifications > E‑mail Alerts Setup > E‑mail Setup 2 Configure the settings. From the Embedded Web Server 1 Open a web browser, and then type the printer IP address in the address field. Notes: • View the printer IP address on the printer home screen. The IP address appears as four sets of numbers separated by periods, such as 123.123.123.123. • If you are using a proxy server, then temporarily disable it to load the web page correctly. 2 Click Settings > Device > Notifications > E‑mail Alerts Setup. 3 From the E‑mail Setup section, configure the settings. 4 Click Save. Printing the Menu Settings Page From the control panel, navigate to: Settings > Reports > Menu Settings Page For non‑touch‑screen printer models, press to navigate through the settings.
-
 1
1 -
2
-
3
-
4
-
5
-
6
-
7
-
8
-
9
-
10
-
11
-
12
-
13
-
14
-
15
-
16
-
17
-
18
-
19
-
20
-
21
-
22
-
23
-
24
-
25
-
 26
26 -
 27
27 -
 28
28 -
 29
29 -
 30
30 -
 31
31 -
 32
32 -
 33
33 -
 34
34 -
 35
35 -
 36
36 -
37
-
38
-
39
-
40
-
41
-
42
-
43
-
44
-
45
-
46
-
47
-
48
-
49
-
50
-
51
-
52
-
53
-
54
-
55
-
56
-
57
-
58
-
59
-
60
-
61
-
62
-
63
-
64
-
65
-
66
-
67
-
68
-
69
-
70
-
71
-
72
-
73
-
74
-
75
-
76
-
77
-
78
-
79
-
80
-
81
-
82
-
83
-
84
-
85
-
86
-
87
-
88
-
89
-
90
-
91
-
92
-
93
-
94
-
95
-
96
-
97
-
98
-
99
-
100
-
101
-
102
-
103
-
104
-
105
-
106
-
107
-
108
-
109
-
110
-
111
-
112
-
113
-
114
-
115
-
116
-
117
-
118
-
119
-
120
-
121
-
122
-
123
-
124
-
125
-
126
-
127
-
128
-
129
-
130
-
131
-
132
-
133
-
134
-
135
-
136
-
137
-
138
-
139
-
140
-
141
-
142
-
143
-
144
-
145
-
146
-
147
-
148
-
149
-
150
-
151
-
152
-
153
-
154
-
155
-
156
-
157
-
158
 |
 |
