Lexmark C760 Quick Reference Pages - Page 11
Using Windows 95 and, Windows 98 first edition, Serial printing, Macintosh
 |
View all Lexmark C760 manuals
Add to My Manuals
Save this manual to your list of manuals |
Page 11 highlights
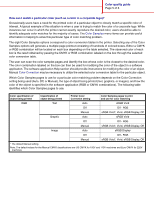
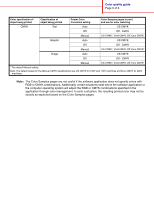
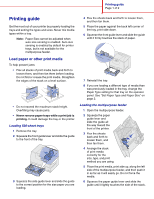
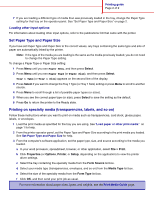
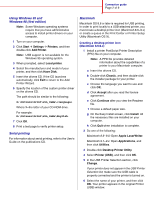
Connection guide Page 2 of 9 Using Windows 95 and Windows 98 (first edition) Note: Some Windows operating systems require that you have administrative access to install printer drivers on your computer. 1 Turn on your computer. 2 Click Start à Settings à Printers, and then double-click Add Printer. Note: USB support is not available for the Windows 95 operating system. 3 When prompted, select Local printer. 4 Select the manufacturer and model of your printer, and then click Have Disk. 5 Insert the drivers CD. If the CD launches automatically, click Exit to return to the Add Printer Wizard. 6 Specify the location of the custom printer driver on the drivers CD. The path should be similar to the following: X:\Drivers\Print\Win_9xMe\ Where X=the letter of your CD-ROM drive. For example: D:\Drivers\Print\Win_9xMe\English. 7 Click OK. 8 Print a test page to verify printer setup. Serial printing For information about serial printing, refer to the User's Guide on the publications CD. Macintosh Macintosh OS 8.6 or later is required for USB printing. In order to print locally to a USB-attached printer, you must create a desktop printer icon (Macintosh 8.6-9.x) or create a queue in the Print Center or Printer Setup Utility (Macintosh OS X). Creating a desktop printer icon (Macintosh 8.6-9.x) 1 Install a printer PostScript Printer Description (PPD) file on your computer. Note: A PPD file provides detailed information about the capabilities of a printer to your Macintosh computer. a Insert the drivers CD. b Double-click Classic, and then double-click the installer package for your printer. c Choose the language you want to use and click OK. d Click Accept after you read the license agreement. e Click Continue after you view the Readme file. f Choose a default paper size. g On the Easy Install screen, click Install. All the necessary files are installed on your computer. h Click Quit when installation is complete. 2 Do one of the following: Macintosh 8.6-9.0: Open Apple LaserWriter. Macintosh 9.1-9.x: Open Applications, and then click Utilities. 3 Double-click Desktop Printer Utility. 4 Select Printer (USB), and then click OK. 5 In the USB Printer Selection section, click Change. If your printer does not appear in the USB Printer Selection list, make sure the USB cable is properly connected and the printer is turned on. 6 Select the name of your printer, and then click OK. Your printer appears in the original Printer (USB) window.
-
 1
1 -
2
-
3
-
4
-
5
-
 6
6 -
 7
7 -
 8
8 -
 9
9 -
 10
10 -
 11
11 -
 12
12 -
 13
13 -
 14
14 -
 15
15 -
 16
16 -
17
-
18
-
19
-
20
-
21
-
22
-
23
-
24
-
25
-
26
-
27
-
28
-
29
-
30
-
31
-
32
-
33
 |
 |
