Lexmark C760 Quick Reference Pages - Page 13
Con for TCP/IP
 |
View all Lexmark C760 manuals
Add to My Manuals
Save this manual to your list of manuals |
Page 13 highlights
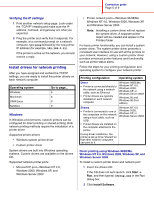
Connection guide Page 4 of 9 also provides important information that helps you configure for network printing. Note: If an optional MarkNet print server is installed, you see Print Net1 Setup on the display. 1 Make sure the printer is on. 2 Press Menu until you see Utilities Menu, and then press Select. 3 Press Menu until you see Print Net Setup, and then press Select. The network setup page prints and the printer returns to Ready status. 4 Check the first section on the network setup page and confirm that Status is "Connected." If Status is "Not Connected," your LAN drop may not be active or your network cable may be malfunctioning. Consult your network support person for a solution, and then print another network setup page to verify that you are connected to your network. Configure for TCP/IP If you have TCP/IP available on your network, we recommend that you assign an IP address to the printer. Assigning a printer IP address If your network is using DHCP, an IP address is automatically assigned after you connect the network cable to the printer. 1 Print a network setup page. 2 Look for the address under the "TCP/IP" heading on the network setup page. 3 Go to Verify printer setup on page 3 and begin with step 2. Note: You can find instructions for other methods of setting the IP address in the online documentation on the drivers CD that shipped with your printer. Launch the CD, and then click View Documentation Network Printer Install. If your network is not using DHCP, then you must manually assign an IP address to the printer. One of the easiest ways is to use the operator panel: 1 Press Menu until you see Network Menu, and then press Select. 2 Press Menu until you see Standard Network, and then press Select. Standard Network appears if you purchased a printer with a network port on the printer system board. If you have a MarkNet™ print server installed in the option card slot, you see Network Option 1. 3 Press Menu until you see Std Net Setup (or Network 1 Setup), and then press Select. 4 Press Menu until you see TCP/IP, and then press Select. 5 Press Menu until you see Set IP Address, and then press Select. 6 Change the address by pressing Menu to increase or decrease each number. Press Select to move to the next segment. Press Select when you are finished. The message Saved appears briefly. 7 Press Menu until you see Set IP Netmask, and then press Select. 8 Repeat step 6 to set the IP Netmask. 9 Press Menu until you see Set IP Gateway, and then press Select. 10 Repeat step 6 to set the IP Gateway. 11 When you are finished, press Go to return the printer to the Ready state.
-
 1
1 -
2
-
3
-
4
-
5
-
6
-
7
-
 8
8 -
 9
9 -
 10
10 -
 11
11 -
 12
12 -
 13
13 -
 14
14 -
 15
15 -
 16
16 -
 17
17 -
 18
18 -
19
-
20
-
21
-
22
-
23
-
24
-
25
-
26
-
27
-
28
-
29
-
30
-
31
-
32
-
33
 |
 |
