Lexmark CS421 Users Guide PDF - Page 167
Software, Installing the printer software
 |
View all Lexmark CS421 manuals
Add to My Manuals
Save this manual to your list of manuals |
Page 167 highlights
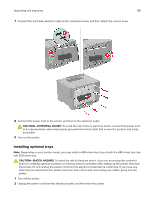
Upgrading and migrating 167 3 Unpack the optional tray, and then remove all packing material. 4 Align the printer with the optional tray, and then lower the printer into place. CAUTION-POTENTIAL INJURY: If the printer weight is greater than 20 kg (44 lb), then it requires two or more trained personnel to lift it safely. Note: If you are installing both the optional trays, then place the 550‑sheet tray below the 650‑sheet duo tray. 5 Connect the power cord to the printer, and then to the electrical outlet. CAUTION-POTENTIAL INJURY: To avoid the risk of fire or electrical shock, connect the power cord to an appropriately rated and properly grounded electrical outlet that is near the product and easily accessible. 6 Turn on the printer. Add the tray in the print driver to make it available for print jobs. For more information, see "Adding available options in the print driver" on page 168. Software Installing the printer software 1 Obtain a copy of the software installer package. • From the software CD that came with your printer. • Go to http://support.lexmark.com, and then select your printer and operating system. 2 Run the installer, and then follow the instructions on the computer screen.
-
 1
1 -
2
-
3
-
4
-
5
-
6
-
7
-
8
-
9
-
10
-
11
-
12
-
13
-
14
-
15
-
16
-
17
-
18
-
19
-
20
-
21
-
22
-
23
-
24
-
25
-
26
-
27
-
28
-
29
-
30
-
31
-
32
-
33
-
34
-
35
-
36
-
37
-
38
-
39
-
40
-
41
-
42
-
43
-
44
-
45
-
46
-
47
-
48
-
49
-
50
-
51
-
52
-
53
-
54
-
55
-
56
-
57
-
58
-
59
-
60
-
61
-
62
-
63
-
64
-
65
-
66
-
67
-
68
-
69
-
70
-
71
-
72
-
73
-
74
-
75
-
76
-
77
-
78
-
79
-
80
-
81
-
82
-
83
-
84
-
85
-
86
-
87
-
88
-
89
-
90
-
91
-
92
-
93
-
94
-
95
-
96
-
97
-
98
-
99
-
100
-
101
-
102
-
103
-
104
-
105
-
106
-
107
-
108
-
109
-
110
-
111
-
112
-
113
-
114
-
115
-
116
-
117
-
118
-
119
-
120
-
121
-
122
-
123
-
124
-
125
-
126
-
127
-
128
-
129
-
130
-
131
-
132
-
133
-
134
-
135
-
136
-
137
-
138
-
139
-
140
-
141
-
142
-
143
-
144
-
145
-
146
-
147
-
148
-
149
-
150
-
151
-
152
-
153
-
154
-
155
-
156
-
157
-
158
-
159
-
160
-
161
-
 162
162 -
 163
163 -
 164
164 -
 165
165 -
 166
166 -
 167
167 -
 168
168 -
 169
169 -
 170
170 -
 171
171 -
 172
172 -
173
-
174
-
175
-
176
-
177
-
178
-
179
-
180
-
181
-
182
-
183
-
184
-
185
-
186
-
187
 |
 |
