Lexmark E250D Service Manual - Page 22
Tools, snugly, Card Stock & Label Guide - e250dn paper jam
 |
View all Lexmark E250D manuals
Add to My Manuals
Save this manual to your list of manuals |
Page 22 highlights
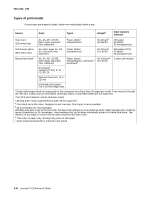
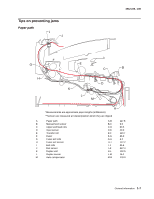
4512-220, -230 Most paper jams can be avoided by correctly loading paper and specialty media in the printer. The following hints can help prevent paper jams: • Do not load wrinkled, creased, or damp media. • Never mix media types within a tray. • Flex, fan, and straighten the media stack before loading it. Note: Make sure the media stack is below the maximum media fill indicators on the 250-sheet tray before pushing the tray into the printer. • Push all trays snugly into the printer after loading them. • Make sure paper guides are positioned before loading the paper or specialty media. • Do not remove trays while a job is printing. Wait for a Load Paper light sequence. • Before loading transparencies, fan the stack to prevent sheets from sticking together. • Do not use envelopes that: - Have excessive curl - Are stuck together - Are damaged in any way - Contain windows, holes, perforations, cutouts, or embossments - Have metal clasps, string ties, or metal folding bars - Have postage stamps attached - Have any exposed adhesive when the flap is in the sealed position • Use only recommended media. Refer to the Card Stock & Label Guide available on the Lexmark Web site at www.lexmark.com for more information about which media provides optimum results for the current printing environment. Tools The removal and adjustment procedures require the following tools and equipment: • Spring hook • Needle nose pliers • Volt-ohmmeter • #1 and #2 Phillips screwdriver • Slotted screwdriver • Flashlight 1-8 Lexmark™ E250d and E250dn
-
 1
1 -
2
-
3
-
4
-
5
-
6
-
7
-
8
-
9
-
10
-
11
-
12
-
13
-
14
-
15
-
16
-
 17
17 -
 18
18 -
 19
19 -
 20
20 -
 21
21 -
 22
22 -
 23
23 -
 24
24 -
 25
25 -
 26
26 -
 27
27 -
28
-
29
-
30
-
31
-
32
-
33
-
34
-
35
-
36
-
37
-
38
-
39
-
40
-
41
-
42
-
43
-
44
-
45
-
46
-
47
-
48
-
49
-
50
-
51
-
52
-
53
-
54
-
55
-
56
-
57
-
58
-
59
-
60
-
61
-
62
-
63
-
64
-
65
-
66
-
67
-
68
-
69
-
70
-
71
-
72
-
73
-
74
-
75
-
76
-
77
-
78
-
79
-
80
-
81
-
82
-
83
-
84
-
85
-
86
-
87
-
88
-
89
-
90
-
91
-
92
-
93
-
94
-
95
-
96
-
97
-
98
-
99
-
100
-
101
-
102
-
103
-
104
-
105
-
106
-
107
-
108
-
109
-
110
-
111
-
112
-
113
-
114
-
115
-
116
-
117
-
118
-
119
-
120
-
121
-
122
-
123
-
124
-
125
-
126
-
127
-
128
-
129
-
130
-
131
-
132
-
133
-
134
-
135
-
136
-
137
-
138
-
139
-
140
-
141
-
142
-
143
-
144
-
145
-
146
-
147
-
148
-
149
-
150
-
151
-
152
-
153
-
154
-
155
-
156
-
157
-
158
-
159
-
160
-
161
-
162
-
163
-
164
 |
 |
