Lexmark E250D Service Manual - Page 82
Configuration menu selections, Utilities - photoconductor kit
 |
View all Lexmark E250D manuals
Add to My Manuals
Save this manual to your list of manuals |
Page 82 highlights
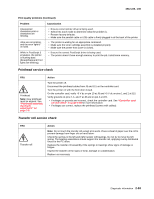
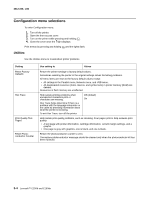
4512-220, -230 Configuration menu selections To enter Configuration menu: 1. Turn off the printer. 2. Open the front access cover. 3. Turn on the printer while pressing and holding . 4. Close the cover once the light displays. Print menus by pressing and holding until the lights flash. Utilities Use the Utilities menu to troubleshoot printer problems. Setting Reset Factory Defaults Hex Trace Print Quality Test Pages Reset Photoconductor Counter Use setting to Values Return the printer settings to factory default values. Sometimes resetting the printer to the original settings solves formatting problems. All menu items are reset to the factory default values except: • All settings in the Parallel menu, Network menu, and USB menu. • All downloaded resources (fonts, macros, and symbol sets) in printer memory (RAM) are deleted. Resources in flash memory are unaffected. Help isolate printing problems when unexpected characters print or characters are missing. Hex Trace helps determine if there is a problem with the language interpreter or the cable by providing information about what the printer is receiving. To exit Hex Trace, turn off the printer. Off (default) On Help isolate print quality problems, such as streaking. Four pages print to help evaluate print quality: • A text page with printer information, cartridge information, current margin settings, and a graphic. • One page is gray with graphics, one is black, and one is blank. Return the photoconductor counter to zero. The replace photoconductor message should be cleared only when the photoconductor kit has been replaced. 3-4 Lexmark™ E250d and E250dn
-
 1
1 -
2
-
3
-
4
-
5
-
6
-
7
-
8
-
9
-
10
-
11
-
12
-
13
-
14
-
15
-
16
-
17
-
18
-
19
-
20
-
21
-
22
-
23
-
24
-
25
-
26
-
27
-
28
-
29
-
30
-
31
-
32
-
33
-
34
-
35
-
36
-
37
-
38
-
39
-
40
-
41
-
42
-
43
-
44
-
45
-
46
-
47
-
48
-
49
-
50
-
51
-
52
-
53
-
54
-
55
-
56
-
57
-
58
-
59
-
60
-
61
-
62
-
63
-
64
-
65
-
66
-
67
-
68
-
69
-
70
-
71
-
72
-
73
-
74
-
75
-
76
-
 77
77 -
 78
78 -
 79
79 -
 80
80 -
 81
81 -
 82
82 -
 83
83 -
 84
84 -
 85
85 -
 86
86 -
 87
87 -
88
-
89
-
90
-
91
-
92
-
93
-
94
-
95
-
96
-
97
-
98
-
99
-
100
-
101
-
102
-
103
-
104
-
105
-
106
-
107
-
108
-
109
-
110
-
111
-
112
-
113
-
114
-
115
-
116
-
117
-
118
-
119
-
120
-
121
-
122
-
123
-
124
-
125
-
126
-
127
-
128
-
129
-
130
-
131
-
132
-
133
-
134
-
135
-
136
-
137
-
138
-
139
-
140
-
141
-
142
-
143
-
144
-
145
-
146
-
147
-
148
-
149
-
150
-
151
-
152
-
153
-
154
-
155
-
156
-
157
-
158
-
159
-
160
-
161
-
162
-
163
-
164
 |
 |
