Lexmark E450DN User's Guide - Page 20
Loading the 250-sheet tray
 |
View all Lexmark E450DN manuals
Add to My Manuals
Save this manual to your list of manuals |
Page 20 highlights
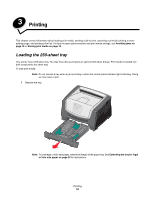
Printing 2 Squeeze the side guide tab, and slide the guide to the outside of the tray. 3 Squeeze the rear guide tab, and slide the guide to the correct position for the size media you are loading. 4 Flex the sheets back and forth to loosen them, then fan them. Do not fold or crease the print media. Straighten the edges on a level surface. 5 Load print media in the tray. Note: Load letterhead paper with the design side facing down. The top edge of the sheet with the logo should be placed at the front of the tray. Make sure the print media is below the paper fill indicator on the side guides. Overloading may cause jams. Loading the 250-sheet tray 20
-
 1
1 -
2
-
3
-
4
-
5
-
6
-
7
-
8
-
9
-
10
-
11
-
12
-
13
-
14
-
 15
15 -
 16
16 -
 17
17 -
 18
18 -
 19
19 -
 20
20 -
 21
21 -
 22
22 -
 23
23 -
 24
24 -
 25
25 -
26
-
27
-
28
-
29
-
30
-
31
-
32
-
33
-
34
-
35
-
36
-
37
-
38
-
39
-
40
-
41
-
42
-
43
-
44
-
45
-
46
-
47
-
48
-
49
-
50
-
51
-
52
-
53
-
54
-
55
-
56
-
57
-
58
-
59
-
60
-
61
-
62
-
63
-
64
-
65
-
66
-
67
-
68
-
69
-
70
 |
 |

Loading the 250-sheet tray
20
Printing
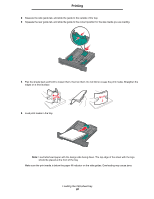
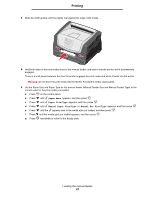
2
Squeeze the side guide tab, and slide the guide to the outside of the tray.
3
Squeeze the rear guide tab, and slide the guide to the correct position for the size media you are loading.
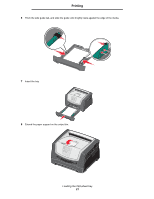
4
Flex the sheets back and forth to loosen them, then fan them. Do not fold or crease the print media. Straighten the
edges on a level surface.
5
Load print media in the tray.
Note:
Load letterhead paper with the design side facing down. The top edge of the sheet with the logo
should be placed at the front of the tray.
Make sure the print media is below the paper fill indicator on the side guides. Overloading may cause jams.