Lexmark Genesis S816 Quick Reference Guide - Page 17
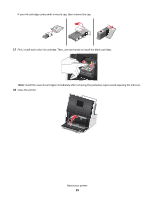
Use the, Access the printhead.
 |
View all Lexmark Genesis S816 manuals
Add to My Manuals
Save this manual to your list of manuals |
Page 17 highlights
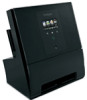
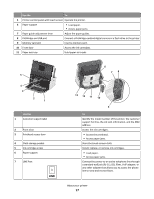
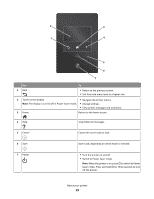
Use the To 5 Printer control panel with touch screen Operate the printer. 6 Paper support • Load paper. • Access paper jams. 7 Paper guide adjustment lever Adjust the paper guides. 8 PictBridge and USB port Connect a PictBridge-enabled digital camera or a flash drive to the printer. 9 Memory card slot Insert a memory card. 10 Front door Access the ink cartridges. 11 Paper exit tray Hold paper as it exits. 5 4 3 2 1 Use the 1 Customer support label 2 Front door 3 Printhead access door 4 Cloth storage pocket 5 Ink cartridge access 6 Paper support 7 LINE Port LINE 6 78 13 12 11 10 9 To Identify the model number of the printer, the customer support hot line, the ink tank information, and the MAC address. Access the ink cartridges. • Access the printhead. • Access paper jams. Store the touch-screen cloth. Install, replace, or remove ink cartridges. • Load paper. • Access paper jams. Connect the printer to an active telephone line through a standard wall jack (RJ-11), DSL filter, VoIP adapter, or any other adapter that allows you to access the phone line to send and receive faxes. About your printer 17
-
 1
1 -
2
-
3
-
4
-
5
-
6
-
7
-
8
-
9
-
10
-
11
-
 12
12 -
 13
13 -
 14
14 -
 15
15 -
 16
16 -
 17
17 -
 18
18 -
 19
19 -
 20
20 -
 21
21 -
 22
22 -
23
-
24
-
25
-
26
-
27
-
28
-
29
-
30
-
31
-
32
-
33
-
34
-
35
-
36
-
37
-
38
-
39
-
40
-
41
-
42
-
43
-
44
-
45
-
46
-
47
-
48
-
49
-
50
-
51
-
52
-
53
-
54
-
55
-
56
-
57
-
58
-
59
-
60
-
61
-
62
-
63
-
64
-
65
-
66
-
67
-
68
-
69
-
70
-
71
-
72
-
73
-
74
-
75
-
76
-
77
-
78
-
79
-
80
-
81
-
82
-
83
-
84
-
85
-
86
-
87
-
88
-
89
-
90
-
91
-
92
-
93
-
94
-
95
-
96
-
97
 |
 |
