Lexmark MB2650 Users Guide PDF - Page 18
Customizing the home screen, Setting up Card Copy, Creating a shortcut, Settings, Device
 |
View all Lexmark MB2650 manuals
Add to My Manuals
Save this manual to your list of manuals |
Page 18 highlights
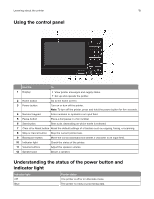
Setting up and using the home screen applications 18 Touch To 10 Shortcut Center Organize all shortcuts. 11 App Profiles Access application profiles. 12 Scan Profiles Scan and save documents directly to the computer. 13 FTP Scan and save documents directly to an FTP server. 14 Bookmarks Organize all bookmarks. 15 Change Language Change the language on the display. Customizing the home screen 1 From the control panel, touch Settings > Device > Visible Home Screen Icons. 2 Select the icons that you want to appear on the home screen. 3 Apply the changes. Setting up Card Copy 1 Open a web browser, and then type the printer IP address in the address field. Notes: • View the printer IP address on the printer home screen. The IP address appears as four sets of numbers separated by periods, such as 123.123.123.123. • If you are using a proxy server, then temporarily disable it to load the web page correctly. 2 Click Apps > Card Copy > Configure. Notes: • Make sure that Display Icon is enabled. • Make sure that E‑mail Settings and Network Share Settings are configured. • When scanning a card, make sure that the scan resolution does not exceed 200 dpi for color and 400 dpi for black and white. • When scanning multiple cards, make sure that the scan resolution does not exceed 150 dpi for color and 300 dpi for black and white. 3 Apply the changes. Note: You need a printer hard disk to scan multiple cards. Creating a shortcut 1 From the home screen, touch Shortcut Center. Note: The icon and name may have been changed. For more information, contact your administrator. 2 Select a printer function, and then touch Create Shortcut. Note: The Secure E‑mail function is not supported.
-
 1
1 -
2
-
3
-
4
-
5
-
6
-
7
-
8
-
9
-
10
-
11
-
12
-
 13
13 -
 14
14 -
 15
15 -
 16
16 -
 17
17 -
 18
18 -
 19
19 -
 20
20 -
 21
21 -
 22
22 -
 23
23 -
24
-
25
-
26
-
27
-
28
-
29
-
30
-
31
-
32
-
33
-
34
-
35
-
36
-
37
-
38
-
39
-
40
-
41
-
42
-
43
-
44
-
45
-
46
-
47
-
48
-
49
-
50
-
51
-
52
-
53
-
54
-
55
-
56
-
57
-
58
-
59
-
60
-
61
-
62
-
63
-
64
-
65
-
66
-
67
-
68
-
69
-
70
-
71
-
72
-
73
-
74
-
75
-
76
-
77
-
78
-
79
-
80
-
81
-
82
-
83
-
84
-
85
-
86
-
87
-
88
-
89
-
90
-
91
-
92
-
93
-
94
-
95
-
96
-
97
-
98
-
99
-
100
-
101
-
102
-
103
-
104
-
105
-
106
-
107
-
108
-
109
-
110
-
111
-
112
-
113
-
114
-
115
-
116
-
117
-
118
-
119
-
120
-
121
-
122
-
123
-
124
-
125
-
126
-
127
-
128
-
129
-
130
-
131
-
132
-
133
-
134
-
135
-
136
-
137
-
138
-
139
-
140
-
141
-
142
-
143
-
144
-
145
-
146
-
147
-
148
-
149
-
150
-
151
-
152
-
153
-
154
-
155
-
156
-
157
-
158
-
159
-
160
-
161
-
162
-
163
-
164
-
165
-
166
-
167
-
168
-
169
-
170
-
171
-
172
-
173
-
174
-
175
-
176
-
177
-
178
-
179
-
180
-
181
-
182
-
183
-
184
-
185
-
186
-
187
-
188
-
189
-
190
-
191
-
192
-
193
-
194
-
195
-
196
-
197
-
198
-
199
-
200
-
201
-
202
-
203
-
204
-
205
-
206
-
207
-
208
-
209
-
210
-
211
-
212
-
213
-
214
-
215
-
216
-
217
-
218
-
219
-
220
-
221
-
222
-
223
-
224
-
225
-
226
-
227
-
228
-
229
-
230
-
231
-
232
-
233
-
234
-
235
-
236
-
237
-
238
-
239
-
240
-
241
-
242
-
243
-
244
-
245
-
246
-
247
-
248
-
249
-
250
-
251
-
252
-
253
-
254
-
255
-
256
-
257
 |
 |
