Lexmark MX6500e 6500e Quick Reference - Page 7
Loading paper and specialty, media
 |
View all Lexmark MX6500e 6500e manuals
Add to My Manuals
Save this manual to your list of manuals |
Page 7 highlights
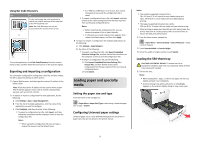
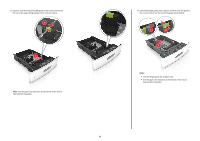
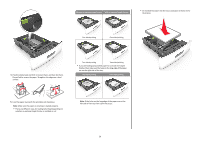
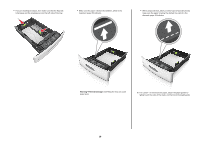
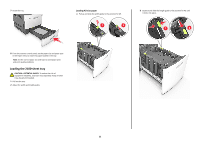
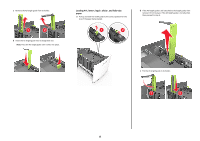
Using Bar Code Discovery Use To Create and manage bar code templates to specify the location and type of bar code that users will frequently scan. Note: Bar Code Discovery can only be accessed from the scanner home screen. or To use the application, touch Bar Code Discovery from the scanner home screen, and then follow the instructions on the scanner display. Exporting and importing a configuration You can export configuration settings into a text file, and then import the file to apply the settings to other devices. 1 Open a Web browser, and then type the scanner IP address in the address field. Note: View the scanner IP address on the scanner home screen. The IP address appears as four sets of numbers separated by periods, such as 123.123.123.123. 2 To export or import a configuration for one application, do the following: a Click Settings > Apps > Apps Management. b From the list of installed applications, click the name of the application you want to configure. c Click Configure, and then do either of the following: • To export a configuration to a file, click Export, and then follow the instructions on the computer screen to save the configuration file. Notes: - When saving the configuration file, you can type a unique file name or use the default name. - If a "JVM Out of Memory" error occurs, then repeat the export process until the configuration file is saved. • To import a configuration from a file, click Import, and then browse to the saved configuration file that was exported from a previously configured device. Notes: - Before importing the configuration file, you can choose to preview it first or load it directly. - If a timeout occurs and a blank screen appears, then refresh the Web browser, and then click Apply. 3 To export or import a configuration for multiple applications, do the following: a Click Settings > Import/Export. b Do either of the following: • To export a configuration file, click Export Embedded Solutions Settings File, and then follow the instructions on the computer screen to save the configuration file. • To import a configuration file, do the following: 1 Click Import Embedded Solutions Settings File > Choose File, and then browse to the saved configuration file that was exported from a previously configured device. 2 Click Submit. Loading paper and specialty media Setting the paper size and type From the home screen navigate to: > Paper Menu > Paper Size/Type > select a tray > select the paper size or type > Submit Configuring Universal paper settings Universal paper size is a user‑defined setting that lets you print on paper sizes that are not preset in the printer menus. 7 Notes: • The smallest supported Universal size is 70 x 127 mm (2.76 x 5 inches) for one‑sided printing and 105 x 148 mm (4.13 x 5.83 inches) for two‑sided (duplex) printing. • The largest supported Universal size is 216 x 356 mm (8.5 x 14 inches) for one‑sided and two‑sided printing. • When printing on paper less than 210 mm (8.3 inches) wide, the printer may print at a reduced speed after a period of time to ensure the best print performance. 1 From the home screen, navigate to: > Paper Menu > Universal Setup > Units of Measure > select a unit of measure 2 Touch Portrait Width or Portrait Height. 3 Select the width or height, and then touch Submit. Loading the 550‑sheet tray CAUTION-POTENTIAL INJURY: To reduce the risk of equipment instability, load each tray separately. Keep all other trays closed until needed. 1 Pull out the tray. Notes: • When loading folio‑, legal‑, or Oficio‑size paper, lift the tray slightly and pull it out completely. • Avoid removing trays while a job prints or while Busy appears on the scanner display. Doing so may cause a jam.
-
 1
1 -
 2
2 -
 3
3 -
 4
4 -
 5
5 -
 6
6 -
 7
7 -
 8
8 -
 9
9 -
 10
10 -
 11
11 -
 12
12 -
13
-
14
-
15
-
16
-
17
-
18
-
19
-
20
-
21
-
22
-
23
-
24
-
25
-
26
-
27
-
28
-
29
-
30
-
31
-
32
-
33
 |
 |