Lexmark P706 User's Guide for Mac OS X - Page 51
Resolving unsuccessful or slow printing, Printer is plugged in, but does not print
 |
View all Lexmark P706 manuals
Add to My Manuals
Save this manual to your list of manuals |
Page 51 highlights
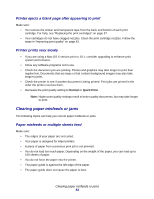
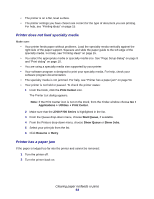
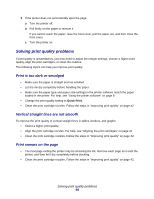
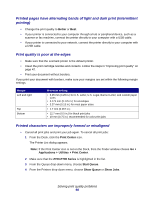
Resolving unsuccessful or slow printing The following topics can help you correct unsuccessful or slow printing. Printer is plugged in, but does not print Make sure: • The printer is on and the printer cable is securely attached at both ends. If your printer is connected to a network, make sure the Lexmark adapter is on and all indicator lights are on. For help, refer to the adapter documentation. • The paper is loaded correctly and not pushed too far into the printer. If the paper is jammed, see "Clearing paper misfeeds or jams" on page 53. • The printer is not held or paused. To check the printer status: 1 From the Dock, click the Print Center icon. The Printer List dialog appears. Note: If the Print Center icon is not on the Dock, from the Finder window choose Go Applications Utilities Print Center. 2 Highlight the Z700-P700 Series in the list. 3 From the Queue drop-down menu, choose Start Queue. 4 From the Printers drop-down menu, choose Show Queue or Show Jobs. 5 Select your job from the list. 6 Click Resume. • The printer is set as the default printer. To set the printer as the default: 1 From the Dock, click the Print Center icon. The Printer List dialog appears. Note: If the Print Center icon is not on the Dock, from the Finder window choose Go Applications Utilities Print Center. 2 Make sure that the Z700-P700 Series is highlighted in the list. After you check these items, print a test page. Resolving unsuccessful or slow printing 51
-
 1
1 -
2
-
3
-
4
-
5
-
6
-
7
-
8
-
9
-
10
-
11
-
12
-
13
-
14
-
15
-
16
-
17
-
18
-
19
-
20
-
21
-
22
-
23
-
24
-
25
-
26
-
27
-
28
-
29
-
30
-
31
-
32
-
33
-
34
-
35
-
36
-
37
-
38
-
39
-
40
-
41
-
42
-
43
-
44
-
45
-
 46
46 -
 47
47 -
 48
48 -
 49
49 -
 50
50 -
 51
51 -
 52
52 -
 53
53 -
 54
54 -
 55
55 -
 56
56 -
57
-
58
-
59
-
60
-
61
-
62
-
63
-
64
-
65
-
66
-
67
 |
 |