Lexmark S515 Quick Reference - Page 14
Warning-Potential Damage - printhead cannot move
 |
View all Lexmark S515 manuals
Add to My Manuals
Save this manual to your list of manuals |
Page 14 highlights
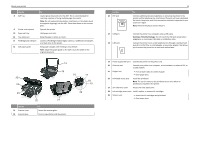
About your printer Use the 8 ADF tray 9 Printer control panel 10 Paper exit tray 11 Tray extension 12 PictBridge and USB port 13 ADF paper guide To Load original documents into the ADF. This is recommended for scanning, copying, or faxing multiple-page documents. Note: Do not load postcards, photos, small items, or thin media (such as magazine clippings) into the ADF. Place these items on the scanner glass. Operate the printer. Hold paper as it exits. Keep the paper in place as it exits. Connect a PictBridge-enabled digital camera, a USB Bluetooth adapter, or a flash drive to the printer. Keep paper straight when feeding it into the ADF. Note: Adjust the paper guide on the ADF tray to the width of the original document. 14 15 16 17 25 18 24 19 23 20 Use the 14 Scanner cover 15 Scanner glass 22 21 To Access the scanner glass. Scan or copy photos and documents. Use the 16 EXT port 17 USB port 18 LINE port 14 To Connect additional devices (telephone or answering machine) to the printer and the telephone line. Use this port if you do not have a dedicated fax line for the printer, and if this connection method is supported in your country or region. Note: Remove the plug to access the port. Connect the printer to a computer using a USB cable. Warning-Potential Damage: Do not touch the USB port except when plugging in or removing a USB cable or installation cable. Connect the printer to an active telephone line through a standard wall jack (RJ‑11), DSL filter, or VoIP adapter, or any other adapter that allows you to access the phone line to send and receive faxes. 19 Power supply with port Connect the printer to the power cord. 20 Ethernet port Connect your printer to a computer, a local network, an external DSL, or a cable modem. 21 Duplex unit • Print on both sides of a sheet of paper. • Clear paper jams. 22 Printhead access area Install the printhead. Note: The carrier moves to the printhead access area when no printhead is installed in the printer. 23 Jam clearance cover Access and clear paper jams. 24 Ink cartridge access area Install, replace, or remove ink cartridges. 25 Scanner unit • Access the ink cartridges and printhead. • Clear paper jams.
-
 1
1 -
2
-
3
-
4
-
5
-
6
-
7
-
8
-
 9
9 -
 10
10 -
 11
11 -
 12
12 -
 13
13 -
 14
14 -
 15
15 -
 16
16 -
 17
17 -
 18
18 -
 19
19 -
20
-
21
-
22
-
23
-
24
-
25
-
26
-
27
-
28
-
29
-
30
-
31
-
32
-
33
-
34
-
35
-
36
-
37
-
38
-
39
-
40
-
41
-
42
-
43
-
44
-
45
-
46
-
47
-
48
-
49
-
50
-
51
-
52
-
53
-
54
-
55
-
56
-
57
 |
 |
