Lexmark T614 Setup Guide (1.4 MB) - Page 24
Step 5, Verify Setup - driver
 |
UPC - 734646289009
View all Lexmark T614 manuals
Add to My Manuals
Save this manual to your list of manuals |
Page 24 highlights
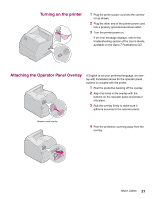
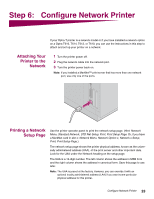
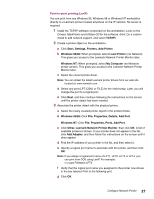
Step 5: Verify Setup Printing the Menu Settings Page The menu settings page shows current settings for the menus and a list of installed options. You can use this page to verify that all printer options are properly installed and the printer settings are set to what you want. Warning! Complete "Removing the Print Cartridge and Packaging" on page 9 before printing a page. 1 Make sure the printer power is on and the Ready status message appears on the display. 2 On the operator panel, press Menu> or or until Print Menus appears on the second line of the display. 6 Press Select. The message Printing Menu Settings appears on the operator panel display until the page prints, then the printer returns to the Ready state. Note: If you receive a message, such as: 201 Paper Jam Remove Cartridge refer to the User's Guide on the Publications CD for more information. 7 Verify that the options you installed are listed on the menu settings page under "Installed Features." If an option you installed does not appear on the page, turn the printer off, unplug the power cord, and reinstall the option. 8 If you attached a serial cable, verify that the printer serial settings listed on the menu settings page are appropriate for your system. Installing Printer Drivers and Utilities 1 Locate the Drivers, MarkVision and Utilities CD. 2 Follow the instructions in the booklet included with the CD to start the printer setup utility appropriate for your operating system. 22 Verify Setup
-
 1
1 -
2
-
3
-
4
-
5
-
6
-
7
-
8
-
9
-
10
-
11
-
12
-
13
-
14
-
15
-
16
-
17
-
18
-
 19
19 -
 20
20 -
 21
21 -
 22
22 -
 23
23 -
 24
24 -
 25
25 -
 26
26 -
 27
27 -
 28
28 -
 29
29 -
30
-
31
-
32
-
33
-
34
-
35
-
36
-
37
 |
 |