Lexmark T640DTN Service Manual - Page 116
xx Fan service check, Main fan, Cartridge fan service check
 |
UPC - 734646725224
View all Lexmark T640DTN manuals
Add to My Manuals
Save this manual to your list of manuals |
Page 116 highlights
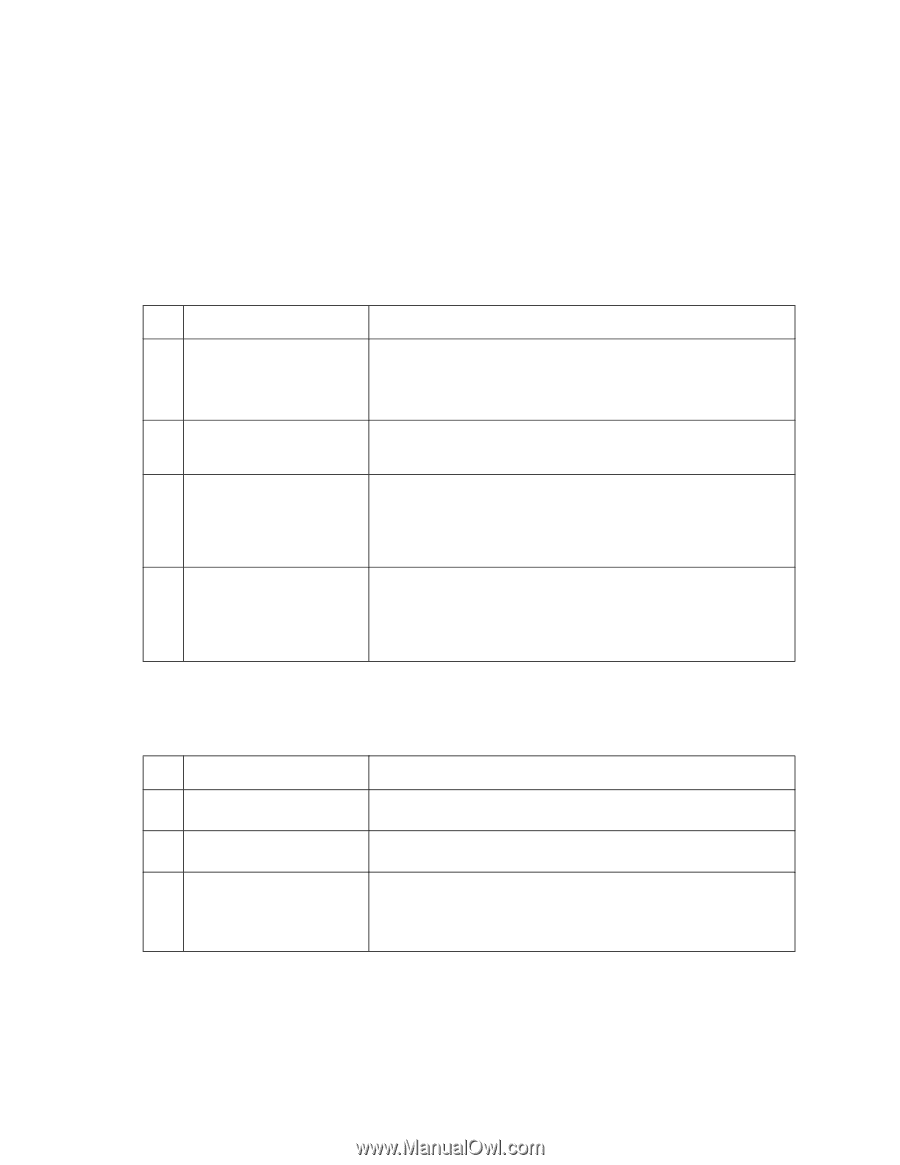
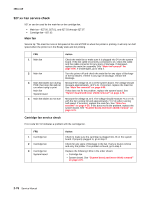
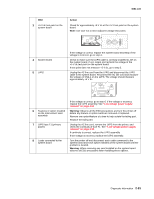
4061-xx0 927.xx Fan service check 927.xx can be used for the main fan or the cartridge fan. • Main fan-927.00, 927.01, and 927.03 through 927.07. • Cartridge fan-927.02 Main fan Service tip: The main fan runs at full speed at the end of POR or when the printer is printing. It will only run half speed when the printer is in the Ready state and not printing. FRU Action 1 Main fan Check the main fan to make sure it is plugged into J4 on the system board. If the fan cable id correctly connected to J4, check the cable and the cable connector for any signs of damage. If damaged, replace the main fan assembly. See "Main fan removal" on page 4-56. If undamaged, go to step 2. 2 Main fan Turn the printer off and check the main fan for any signs of blockage of the fan blades. If there is any sign of blockage, remove the blockage. 3 Main fan blades turn during POR, then stop. Fan will not run when trying to print. Main fan System board Measure the voltage at J4-1 on the system board. The voltage should measure approximately +2.5 V dc. If incorrect, replace the main fan. See "Main fan removal" on page 4-56. If that does not fix the problem, replace the system board. See "System board and inner shield removal" on page 4-76. 4 Main fan blades do not turn Measure the voltage at J4-3. The voltage should measure +14.4 V dc with the fan running full and approximately 7.0 V dc when running half speed. If incorrect, replace the main fan. See "Main fan removal" on page 4-56. If this does not fix the problem, replace the system board. See "System board and inner shield removal" on page 4-76. Cartridge fan service check Error code 927.02 indicates a problem with the cartridge fan. FRU 1 Cartridge fan 2 Cartridge fan 3 Cartridge fan System board Action Check to make sure the cartridge is plugged into J5 on the system board. If properly plugged in, go to step 2. Check for any signs of blockage in the fan. If any is found, remove and retry the printer. If no problem is found, go to step 3. Replace the following FRUs in the order shown: • Cartridge fan. • System board. See "System board and inner shield removal" on page 4-76. 2-76 Service Manual
-
 1
1 -
2
-
3
-
4
-
5
-
6
-
7
-
8
-
9
-
10
-
11
-
12
-
13
-
14
-
15
-
16
-
17
-
18
-
19
-
20
-
21
-
22
-
23
-
24
-
25
-
26
-
27
-
28
-
29
-
30
-
31
-
32
-
33
-
34
-
35
-
36
-
37
-
38
-
39
-
40
-
41
-
42
-
43
-
44
-
45
-
46
-
47
-
48
-
49
-
50
-
51
-
52
-
53
-
54
-
55
-
56
-
57
-
58
-
59
-
60
-
61
-
62
-
63
-
64
-
65
-
66
-
67
-
68
-
69
-
70
-
71
-
72
-
73
-
74
-
75
-
76
-
77
-
78
-
79
-
80
-
81
-
82
-
83
-
84
-
85
-
86
-
87
-
88
-
89
-
90
-
91
-
92
-
93
-
94
-
95
-
96
-
97
-
98
-
99
-
100
-
101
-
102
-
103
-
104
-
105
-
106
-
107
-
108
-
109
-
110
-
 111
111 -
 112
112 -
 113
113 -
 114
114 -
 115
115 -
 116
116 -
 117
117 -
 118
118 -
 119
119 -
 120
120 -
 121
121 -
122
-
123
-
124
-
125
-
126
-
127
-
128
-
129
-
130
-
131
-
132
-
133
-
134
-
135
-
136
-
137
-
138
-
139
-
140
-
141
-
142
-
143
-
144
-
145
-
146
-
147
-
148
-
149
-
150
-
151
-
152
-
153
-
154
-
155
-
156
-
157
-
158
-
159
-
160
-
161
-
162
-
163
-
164
-
165
-
166
-
167
-
168
-
169
-
170
-
171
-
172
-
173
-
174
-
175
-
176
-
177
-
178
-
179
-
180
-
181
-
182
-
183
-
184
-
185
-
186
-
187
-
188
-
189
-
190
-
191
-
192
-
193
-
194
-
195
-
196
-
197
-
198
-
199
-
200
-
201
-
202
-
203
-
204
-
205
-
206
-
207
-
208
-
209
-
210
-
211
-
212
-
213
-
214
-
215
-
216
-
217
-
218
-
219
-
220
-
221
-
222
-
223
-
224
-
225
-
226
-
227
-
228
-
229
-
230
-
231
-
232
-
233
-
234
-
235
-
236
-
237
-
238
-
239
-
240
-
241
-
242
-
243
-
244
-
245
-
246
-
247
-
248
-
249
-
250
-
251
-
252
-
253
-
254
-
255
-
256
-
257
-
258
-
259
-
260
-
261
-
262
-
263
-
264
-
265
-
266
-
267
-
268
-
269
-
270
-
271
-
272
-
273
-
274
-
275
-
276
-
277
-
278
-
279
-
280
-
281
-
282
-
283
-
284
-
285
-
286
-
287
-
288
-
289
-
290
-
291
-
292
-
293
-
294
-
295
-
296
-
297
-
298
-
299
-
300
-
301
-
302
-
303
-
304
-
305
-
306
-
307
-
308
-
309
-
310
-
311
-
312
-
313
-
314
-
315
-
316
-
317
-
318
-
319
-
320
-
321
-
322
-
323
-
324
-
325
-
326
-
327
-
328
-
329
-
330
-
331
-
332
-
333
-
334
-
335
-
336
-
337
-
338
-
339
-
340
-
341
-
342
-
343
-
344
-
345
-
346
-
347
-
348
-
349
-
350
-
351
-
352
-
353
-
354
-
355
-
356
-
357
-
358
-
359
-
360
-
361
-
362
-
363
-
364
-
365
-
366
-
367
-
368
-
369
-
370
-
371
-
372
-
373
-
374
-
375
-
376
-
377
-
378
-
379
-
380
-
381
-
382
-
383
-
384
-
385
-
386
-
387
-
388
-
389
-
390
-
391
-
392
-
393
-
394
-
395
-
396
-
397
-
398
-
399
-
400
-
401
-
402
-
403
-
404
-
405
-
406
-
407
-
408
-
409
-
410
-
411
-
412
-
413
-
414
-
415
-
416
-
417
-
418
-
419
-
420
-
421
-
422
 |
 |