Lexmark X204 User Guide - Page 143
Solving printing problems, Jobs do not print, Make sure the printer is ready to print
 |
View all Lexmark X204 manuals
Add to My Manuals
Save this manual to your list of manuals |
Page 143 highlights
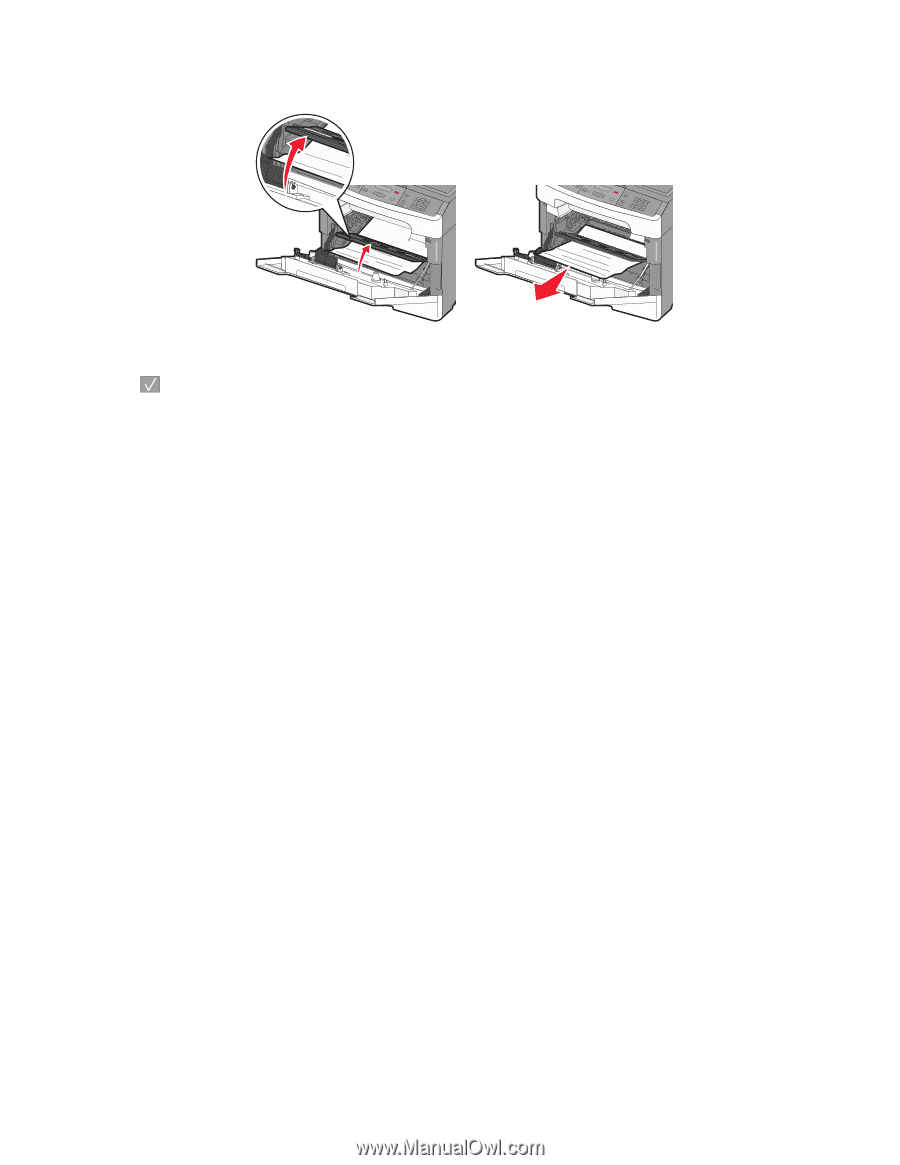
2 Lift the flap at the front of the printer, and then remove any jammed sheets. 3 Align and insert the photoconductor kit and toner cartridge. 4 Press . Solving printing problems Jobs do not print These are possible solutions. Try one or more of the following: MAKE SURE THE PRINTER IS READY TO PRINT Make sure Ready or Power Saver appears on the display before sending a job to print. CHECK TO SEE IF THE STANDARD EXIT BIN IS FULL Remove the stack of paper from the standard exit bin. CHECK TO SEE IF THE TRAY IS EMPTY Load paper in the tray. MAKE SURE THE CORRECT PRINTER SOFTWARE IS INSTALLED Verify that you installed the correct printer software for your printer model. Open the Software and Documentation CD to check which software is installed. For more information, see "Installing printer software" on page 21. Make sure the model number of the software matches the model number of your printer. To verify that the printer software is the most current, check the Lexmark Web site at www.lexmark.com. MAKE SURE THE PRINTER IS CONNECTED TO THE NETWORK Print a network setup page and check that the status shows Connected. If the status is Not Connected, check the network cables, and then try printing the network setup page again. Contact your system support person to make sure the network is functioning correctly. Troubleshooting 143
-
 1
1 -
2
-
3
-
4
-
5
-
6
-
7
-
8
-
9
-
10
-
11
-
12
-
13
-
14
-
15
-
16
-
17
-
18
-
19
-
20
-
21
-
22
-
23
-
24
-
25
-
26
-
27
-
28
-
29
-
30
-
31
-
32
-
33
-
34
-
35
-
36
-
37
-
38
-
39
-
40
-
41
-
42
-
43
-
44
-
45
-
46
-
47
-
48
-
49
-
50
-
51
-
52
-
53
-
54
-
55
-
56
-
57
-
58
-
59
-
60
-
61
-
62
-
63
-
64
-
65
-
66
-
67
-
68
-
69
-
70
-
71
-
72
-
73
-
74
-
75
-
76
-
77
-
78
-
79
-
80
-
81
-
82
-
83
-
84
-
85
-
86
-
87
-
88
-
89
-
90
-
91
-
92
-
93
-
94
-
95
-
96
-
97
-
98
-
99
-
100
-
101
-
102
-
103
-
104
-
105
-
106
-
107
-
108
-
109
-
110
-
111
-
112
-
113
-
114
-
115
-
116
-
117
-
118
-
119
-
120
-
121
-
122
-
123
-
124
-
125
-
126
-
127
-
128
-
129
-
130
-
131
-
132
-
133
-
134
-
135
-
136
-
137
-
 138
138 -
 139
139 -
 140
140 -
 141
141 -
 142
142 -
 143
143 -
 144
144 -
 145
145 -
 146
146 -
 147
147 -
 148
148 -
149
-
150
-
151
-
152
-
153
-
154
-
155
-
156
-
157
-
158
-
159
-
160
-
161
-
162
-
163
-
164
-
165
-
166
-
167
-
168
-
169
-
170
-
171
-
172
-
173
-
174
-
175
-
176
-
177
-
178
-
179
-
180
-
181
-
182
-
183
-
184
-
185
 |
 |