Lexmark X4950 User's Guide - Page 29
Using the printer software, Installing printer software - installation software
 |
View all Lexmark X4950 manuals
Add to My Manuals
Save this manual to your list of manuals |
Page 29 highlights
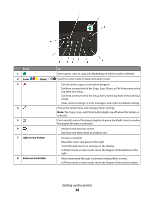
3 Press the up or down arrow button until Clear Settings Timeout is highlighted, and then press OK. 4 Press the up or down arrow button until Never is highlighted, and then press OK. 5 Press until you exit Setup, or press another mode button. Changing the Power Saver timeout You can customize the Power Saver timeout of the printer. The Power Saver timeout is the time it takes for the printer to switch to Power Saver mode when the printer is left idle. Change the Power Saver timeout to avoid interruptions when doing multiple jobs on your printer. 1 From the printer control panel, press . 2 Press the up or down arrow button until Device Setup is highlighted, and then press OK. 3 Press the up or down arrow button until Power Saver is highlighted, and then press OK. 4 Press the up or down arrow button to select a Power Saver timeout, and then press OK. Note: If you want to be efficient on power usage, then select the minimum Power Saver timeout from the options. If you do not want to turn the printer back on from Power Saver mode as often, then select the maximum Power Saver timeout. 5 Press until you exit Setup, or press another mode button. Using the printer software Installing printer software Using Windows 1 Close all open software programs. 2 Insert the installation software CD. If the Welcome screen does not appear after a minute, do one of the following: In Windows Vista a Click . b In the Start Search box, type D:\setup.exe, where D is the letter of your CD or DVD drive. In Windows XP and earlier a Click Start. b Click Run. c Type D:\setup.exe, where D is the letter of your CD or DVD drive. 3 Follow the instructions on the Welcome screen to set up the printer. Setting up the printer 29
-
 1
1 -
2
-
3
-
4
-
5
-
6
-
7
-
8
-
9
-
10
-
11
-
12
-
13
-
14
-
15
-
16
-
17
-
18
-
19
-
20
-
21
-
22
-
23
-
 24
24 -
 25
25 -
 26
26 -
 27
27 -
 28
28 -
 29
29 -
 30
30 -
 31
31 -
 32
32 -
 33
33 -
 34
34 -
35
-
36
-
37
-
38
-
39
-
40
-
41
-
42
-
43
-
44
-
45
-
46
-
47
-
48
-
49
-
50
-
51
-
52
-
53
-
54
-
55
-
56
-
57
-
58
-
59
-
60
-
61
-
62
-
63
-
64
-
65
-
66
-
67
-
68
-
69
-
70
-
71
-
72
-
73
-
74
-
75
-
76
-
77
-
78
-
79
-
80
-
81
-
82
-
83
-
84
-
85
-
86
-
87
-
88
-
89
-
90
-
91
-
92
-
93
-
94
-
95
-
96
-
97
-
98
-
99
-
100
-
101
-
102
-
103
-
104
-
105
-
106
-
107
-
108
-
109
-
110
-
111
-
112
-
113
-
114
-
115
-
116
-
117
-
118
-
119
-
120
-
121
-
122
-
123
-
124
-
125
-
126
-
127
-
128
-
129
-
130
-
131
-
132
-
133
-
134
-
135
-
136
-
137
-
138
-
139
-
140
-
141
-
142
-
143
-
144
-
145
-
146
-
147
-
148
-
149
 |
 |
