Lexmark X644E Troubleshooting Guide - Page 4
Toner smears or print comes off - toner part number
 |
UPC - 734646093156
View all Lexmark X644E manuals
Add to My Manuals
Save this manual to your list of manuals |
Page 4 highlights
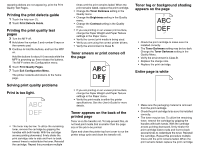
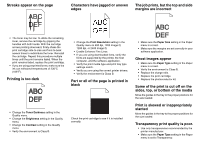
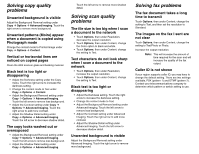
repeating defects are not appearing, print the Print Quality Test Pages. Printing the print defects guide 1 Touch the help icon (?). 2 Touch Print Defects Guide. Printing the print quality test pages 3 Turn the MFP off. 4 Hold down the number 2 and number 6 keys on the numeric pad. 5 Continue to hold the buttons, and turn the MFP on. Hold the buttons for about 10 seconds while the MFP is powering up, then release the buttons. The MFP enters the Configuration menu. 6 Touch Print Quality Pages. 7 Touch Exit Configuration Menu. The printer restarts and returns to the home page. Solving print quality problems Print is too light. • The toner may be low. To utilize the remaining toner, remove the cartridge by gripping the handles with both hands. With the cartridge arrows pointing downward, firmly shake the print cartridge side-to-side and front-to-back several times to redistribute the toner. Reinstall the cartridge. Repeat this procedure multiple times until the print remains faded. When the print remains faded, replace the print cartridge. • Change the Toner Darkness setting in the Quality menu. • Change the Brightness setting in the Quality menu. • Change the Contrast setting in the Quality menu. • If you are printing on an uneven print surface, change the Paper Weight and Paper Texture settings in the Paper menu. • Verify the correct print media is being used. • Verify you are using the correct printer drivers. • Verify the environment is Class B. Toner smears or print comes off the page Toner fog or background shading appears on the page • Check the print cartridge to make sure it is installed correctly. • The Toner Darkness setting may be too dark. Change the Toner Darkness setting in the Quality Menu. • Verify the environment is Class B. • Replace the charge rolls. • Replace the print cartridge. Entire page is white • If you are printing on an uneven print surface, change the Paper Weight and Paper Texture settings in the Paper menu. • Verify the print media is within the printer specifications. See the User's Guide for more details. Toner appears on the back of the printed page Toner is on the transfer roll. To help prevent this, do not load print media that is smaller than the page size of the job to be printed. Open and close the printer top front cover to run the printer setup cycle and clean the transfer roll. • Make sure the packaging material is removed from the print cartridge. • Check the print cartridge to be sure it is installed correctly. • The toner may be low. To utilize the remaining toner, remove the cartridge by gripping the handles with both hands. With the cartridge arrows pointing downward, firmly shake the print cartridge side-to-side and front-to-back several times to redistribute the toner. Reinstall the cartridge. Repeat this procedure multiple times until the print remains faded. When the print remains faded, replace the print cartridge.
-
 1
1 -
 2
2 -
 3
3 -
 4
4 -
 5
5 -
 6
6
 |
 |
