LiftMaster 3800 3800 Manual - Page 11
IMPORTANT SAFETY INSTRUCTIONS, To reduce the risk of SEVERE INJURY or DEATH - install
 |
UPC - 012381308002
View all LiftMaster 3800 manuals
Add to My Manuals
Save this manual to your list of manuals |
Page 11 highlights
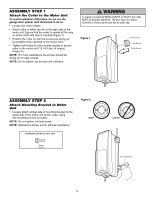
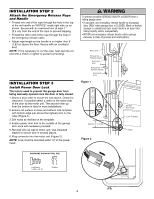
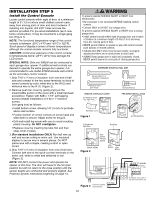
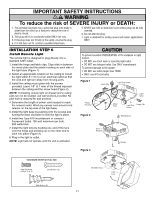
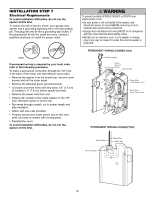
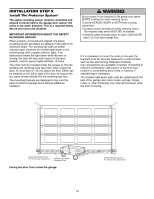
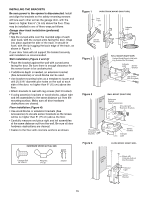
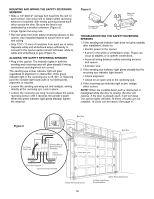
IMPORTANT SAFETY INSTRUCTIONS WARNING To reduce the risk of SEVERE INJURY or DEATH: 1. This portable luminaire has a polarized plug (one blade is wider than the other) as a feature to reduce the risk of electric shock. 2. This plug will fit in a polarized outlet ONLY one way. 3. If the plug does not fit fully in the outlet, reverse the plug. 4. If it still does not fit, contact a qualified electrician. 5. NEVER use with an extension cord unless plug can be fully inserted. 6. Do not alter the plug. 7. Light is intended for ceiling mount and indoor applications ONLY. WARNING INSTALLATION STEP 6 Install Remote Light The remote light is designed to plug directly into a standard 120V outlet. 1. Install the hinge and latch clips. Clips slide in between the metal plate and the plastic housing on each side of the light base (Figure 1). 2. Select an appropriate location on the ceiling to mount the light within 6' (1.8 m) of an electrical outlet so that the cord and light are away from moving parts. 3. Install the ceiling mount plate with the screws provided. Leave 1/8" (3.1 mm) of the thread exposed between the ceiling and the screw head (Figure 2). NOTE: If installing remote light on drywall and a ceiling joist can not be located, use wall anchors provided. No pilot hole is required for wall anchors. 4. Determine the length of power cord needed to reach the nearest outlet. Wind any excess cord around cord retainer on the top side of the light base. 5. Install the light base by pushing onto the screws and turning the base clockwise to lock the light in place. 6. Install two Type A19 incandescent or compact fluorescent bulbs. 100 watt maximum per bulb, 200 watts total. 7. Install the light lens by hooking one end of the lens over the hinge and pressing up on the other end to latch into place (Figure 3). 8. Plug in the light to outlet. NOTE: Light will not operate until the unit is activated. CAUTION To prevent possible OVERHEATING of the endpanel or light socket: • DO NOT use short neck or specialty light bulbs. • DO NOT use halogen bulbs. Use ONLY incandescent. To prevent damage to the opener: • DO NOT use bulbs larger than 100W. • ONLY use A19 size bulbs. Figure 1 Latch Clip Light Clip Screw Plastic Housing Figure 2 Light Base Metal Plate Light Clip Hinge Clip Screw Wall Anchors Cord Retainer Scews Figure 3 HARDWARE SHOWN ACTUAL SIZE Light Clip Screw #4-20 X 7/16" (2) Screw #6x1" (2) 100 Watt (max) Light Lens Wall Anchor (2) 11
-
 1
1 -
2
-
3
-
4
-
5
-
 6
6 -
 7
7 -
 8
8 -
 9
9 -
 10
10 -
 11
11 -
 12
12 -
 13
13 -
 14
14 -
 15
15 -
 16
16 -
17
-
18
-
19
-
20
-
21
-
22
-
23
-
24
-
25
-
26
-
27
-
28
-
29
-
30
-
31
-
32
 |
 |
