LiftMaster 3800 3800 Manual - Page 18
Adjustment Step 2 - repair
 |
UPC - 012381308002
View all LiftMaster 3800 manuals
Add to My Manuals
Save this manual to your list of manuals |
Page 18 highlights
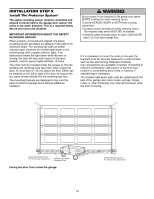
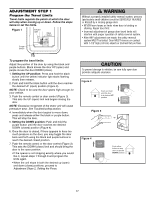
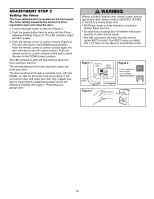
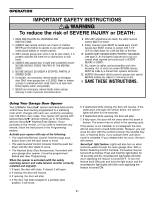
ADJUSTMENT STEP 2 Setting the Force The force setting button is located on the front panel. The force setting measures the amount of force required to open and close the door. 1. Locate the purple button on the unit (Figure 1). 2. Push the purple button twice to enter unit into Force Adjustment Mode (Figure 2). The LED (Indicator Light) will flash quickly. 3. Push the remote control or control console (Figure 3). The door will travel to the DOWN (close) position. Push the remote control or control console again, the door will travel to the UP (open) position. Push the remote control or control console a third time to send the door to the DOWN (close) position. The LED (Indicator Light) will stop flashing when the force has been learned. The unit has learned the forces required to open and close your door. The door must travel through a complete cycle, UP and DOWN, in order for the force to be set properly. If the unit cannot open and close your door fully, inspect your door to insure that it is balanced properly and is not sticking or binding. See page 4, "Preparing your garage door." WARNING Without a properly installed safety reversal system, persons CAUTION (particularly small children) could be SERIOUSLY INJURED or KILLED by a closing garage door. • NEVER learn forces or limits when door is binding or sticking. Repair door first • Too much force on garage door will interfere with proper operation of safety reversal system. • After ANY adjustments are made, the safety reversal system MUST be tested. Door MUST reverse on contact with 1-1/2" high (3.8 cm) object (or 2x4 laid flat) on floor. Figure 1 Indicator Light Black Button Purple Button Figure 2 Push Purple button twice to enter unit into Force Adjustment Mode BLACK PURPLE Figure 3 or LOCK LIGHT 18
-
 1
1 -
2
-
3
-
4
-
5
-
6
-
7
-
8
-
9
-
10
-
11
-
12
-
 13
13 -
 14
14 -
 15
15 -
 16
16 -
 17
17 -
 18
18 -
 19
19 -
 20
20 -
 21
21 -
 22
22 -
 23
23 -
24
-
25
-
26
-
27
-
28
-
29
-
30
-
31
-
32
 |
 |
