LiftMaster LA412UL Installation Manual - Page 13
Step 4 Secure the Brackets, Post Bracket, Gate Bracket
 |
View all LiftMaster LA412UL manuals
Add to My Manuals
Save this manual to your list of manuals |
Page 13 highlights
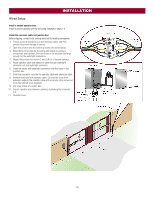
INSTALLATION Step 4 Secure the Brackets Post Bracket The gate operator (arm) must be level. 1. Mark holes for the post bracket. Remove the clamp and the operator, set aside. 2. Drill adequate holes in the gate post. 3. Secure the post bracket to the gate post using hardware. Gate Bracket The gate operator (arm) must be level. Some installations may require additional reinforcement be installed on the gate. 1. Drill holes in gate (or reinforcement, if necessary) that are large enough for the gate bracket mounting hardware. 2. Secure the gate operator to the gate using hardware (not provided). 3. Manually move the gate to verify that it opens and closes fully. 13
-
 1
1 -
2
-
3
-
4
-
5
-
6
-
7
-
 8
8 -
 9
9 -
 10
10 -
 11
11 -
 12
12 -
 13
13 -
 14
14 -
 15
15 -
 16
16 -
 17
17 -
 18
18 -
19
-
20
-
21
-
22
-
23
-
24
-
25
-
26
-
27
-
28
-
29
-
30
-
31
-
32
-
33
-
34
-
35
-
36
-
37
-
38
-
39
-
40
-
41
-
42
-
43
-
44
-
45
-
46
-
47
-
48
-
49
-
50
-
51
-
52
 |
 |

13
Step 4 Secure the Brackets
Post Bracket
The gate operator (arm) must be level.
1.
Mark holes for the post bracket. Remove the clamp and the operator, set aside.
2.
Drill adequate holes in the gate post.
3.
Secure the post bracket to the gate post using hardware.
Gate Bracket
The gate operator (arm) must be level.
Some installations may require additional reinforcement be installed on the gate.
1.
Drill holes in gate (or reinforcement, if necessary) that are large enough for the gate bracket mounting hardware.
2.
Secure the gate operator to the gate using hardware (not provided).
3.
Manually move the gate to verify that it opens and closes fully.
INSTALLATION