Linksys WRT55AG User Guide - Page 14
Connecting the Dual-Band Wireless A+G Broadband Router - antenna
 |
UPC - 745883553891
View all Linksys WRT55AG manuals
Add to My Manuals
Save this manual to your list of manuals |
Page 14 highlights
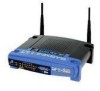
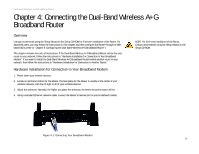
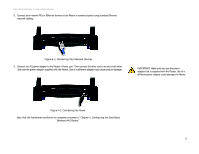
Dual-Band Wireless A+G Broadband Router Chapter 4: Connecting the Dual-Band Wireless A+G Broadband Router Overview Linksys recommends using the Setup Wizard on the Setup CD-ROM for first-time installation of the Router. For advanced users, you may follow the instructions in this chapter, and then configure the Router through its Webbased Utility (refer to "Chapter 5: Configuring the Dual-Band Wireless A+G Broadband Router"). This chapter includes two sets of instructions. If the Dual-Band Wireless A+G Broadband Router will be the only router in your network, follow the instructions in "Hardware Installation for Connection to Your Broadband Modem." If you want to install the Dual-Band Wireless A+G Broadband Router behind another router in your network, then follow the instructions in "Hardware Installation for Connection to Another Router." Hardware Installation for Connection to Your Broadband Modem 1. Power down your network devices. 2. Locate an optimum location for the Router. The best place for the Router is usually at the center of your wireless network, with line of sight to all of your wireless devices. 3. Adjust the antennas. Normally, the higher you place the antennas, the better the performance will be. 4. Using a standard Ethernet network cable, connect the Router's Internet port to your broadband modem. NOTE: For first-time installation of the Router, Linksys recommends using the Setup Wizard on the Setup CD-ROM. Figure 4-1: Connecting Your Broadband Modem Chapter 4: Connecting the Dual-Band Wireless A+G Broadband Router 8 Overview
-
 1
1 -
2
-
3
-
4
-
5
-
6
-
7
-
8
-
 9
9 -
 10
10 -
 11
11 -
 12
12 -
 13
13 -
 14
14 -
 15
15 -
 16
16 -
 17
17 -
 18
18 -
 19
19 -
20
-
21
-
22
-
23
-
24
-
25
-
26
-
27
-
28
-
29
-
30
-
31
-
32
-
33
-
34
-
35
-
36
-
37
-
38
-
39
-
40
-
41
-
42
-
43
-
44
-
45
-
46
-
47
-
48
-
49
-
50
-
51
-
52
-
53
-
54
-
55
-
56
-
57
-
58
-
59
-
60
-
61
-
62
-
63
-
64
-
65
-
66
-
67
-
68
-
69
-
70
-
71
-
72
-
73
-
74
-
75
-
76
-
77
-
78
-
79
-
80
-
81
-
82
-
83
 |
 |
