Logitech 930-000012 Owners Guide - Page 5
Audio Connections, Using Transporter as a Standalone DAC, Connecting Transporter
 |
UPC - 097855045720
View all Logitech 930-000012 manuals
Add to My Manuals
Save this manual to your list of manuals |
Page 5 highlights
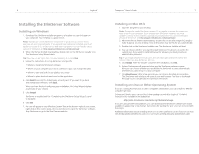
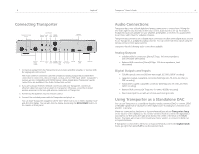
8 Connecting Transporter Unbalanced Analog Outputs Digital Inputs Optical Coax S/ BNC AES/EBU TOSLINK PDIF S/PDIF Balanced Logitech® Antenna Connectors Balanced Analog Outputs Optical Coax S/ BNC AES/EBU Word PDIF S/PDIF Balanced Clock Input Infrared Ethernet Input Output RS-232 Serial AC Power 1. Connect an output from the Transporter to your stereo amplifier, preamp, or receiver with the appropriate interconnect. The most common connection uses the unbalanced analog output red and white RCA connectors to connect to a line-level input, such as a CD or TAPE input. (Note: Transporter's outputs are not compatible with PHONO inputs.) More details about Transporter's audio connections are available in the Audio Connections section. 2. If you are using an ethernet network connection with your Transporter, connect an ethernet cable from your hub or switch to Transporter. Otherwise, screw the included wireless antennae to the two gold antenna connectors on Transporter. 3. Put the two AA batteries into the remote control. 4. Connect the included power cable to Transporter and plug it in. You can leave Transporter plugged in all the time. When not in use, it enters standby mode and dims the display. You can also dim the display by pressing the BRIGHTNESS button on the remote or front panel. Transporter™ Owner's Guide 9 Audio Connections Transporter has a host of both digital and analog connections to choose from. Picking the one that's right for you depends on how your current audio system is set up. For instance, if balanced inputs are available on your amplifier, preamplifier, or receiver, it's usually better to use those rather than the unbalanced inputs. Transporter also provides a set of digital input connections to allow other digital audio sources to use Transporter as a digital to analog converter. You can select from these inputs using the remote control or front panel controls. Transporter has the following audio connections available: Analog Outputs • Unbalanced RCA connections (2Vrms/5.7Vpp, 100 ohms impedance, with selectable attenuation) • Balanced XLR connectors (3Vrms/8.5Vpp, 100 ohms impedance, fixed attenuation) Digital Outputs and Inputs • TOSLINK optical connector (660nm wavelength, IEC-958 / S/PDIF encoding) • Capacitor-coupled coaxial RCA connector (500mVpp into 75 ohms, IEC-958 / S/ PDIF encoding) • Transformer-coupled coaxial BNC connector (500mVpp into 75 ohms, IEC-958 / S/PDIF encoding) • Balanced XLR connector (4.7Vpp into 110 ohms, AES/EBU encoding) • Word clock input for use with an external word clock generator Using Transporter as a Standalone DAC You can use Transporter as a standalone digital-to-analog converter (DAC) to convert S/PDIF or AES/EBU signals from a CD player or other digital source to analog for connection to an amplifier or preamp. When not connected to SlimServer or SqueezeNetwork (you will see Transporter Setup on the top line of the display), use the remote control or knob to scroll to the digital input you'd like to use then press the right arrow button, the center of the knob or the PLAY button. That input will remain selected until you choose another or connect to SlimServer or SqueezeNetwork. If Transporter is connected to SlimServer or SqueezeNetwork, scroll to the Digital Inputs menu, go right, then press PLAY to use the selected input.
-
 1
1 -
 2
2 -
 3
3 -
 4
4 -
 5
5 -
 6
6 -
 7
7 -
 8
8 -
 9
9 -
 10
10 -
 11
11 -
12
-
13
-
14
-
15
-
16
-
17
-
18
-
19
-
20
-
21
 |
 |
