MSI MEG X399 CREATION User Manual - Page 78
Software Description, Installing Windows® 10, Installing Drivers, Installing Utilities
 |
View all MSI MEG X399 CREATION manuals
Add to My Manuals
Save this manual to your list of manuals |
Page 78 highlights
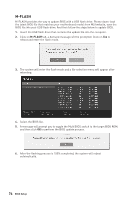
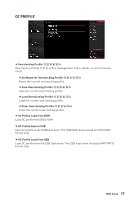
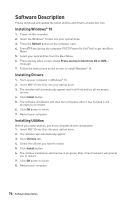
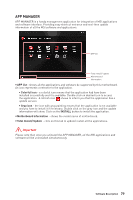
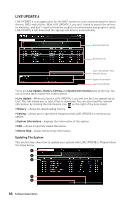
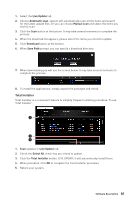
Software Description Please download and update the latest utilities and drivers at www.msi.com Installing Windows® 10 1. Power on the computer. 2. Insert the Windows® 10 disc into your optical drive. 3. Press the Restart button on the computer case. 4. Press F11 key during the computer POST (Power-On Self Test) to get into Boot Menu. 5. Select your optical drive from the Boot Menu. 6. Press any key when screen shows Press any key to boot from CD or DVD... message. 7. Follow the instructions on the screen to install Windows® 10. Installing Drivers 1. Start up your computer in Windows® 10. 2. Insert MSI® Driver Disc into your optical drive. 3. The installer will automatically appear and it will find and list all necessary drivers. 4. Click Install button. 5. The software installation will then be in progress, after it has finished it will prompt you to restart. 6. Click OK button to finish. 7. Restart your computer. Installing Utilities Before you install utilities, you must complete drivers installation. 1. Insert MSI® Driver Disc into your optical drive. 2. The installer will automatically appear. 3. Click Utilities tab. 4. Select the utilities you want to install. 5. Click Install button. 6. The utilities installation will then be in progress, after it has finished it will prompt you to restart. 7. Click OK button to finish. 8. Restart your computer. 78 Software Description
-
 1
1 -
2
-
3
-
4
-
5
-
6
-
7
-
8
-
9
-
10
-
11
-
12
-
13
-
14
-
15
-
16
-
17
-
18
-
19
-
20
-
21
-
22
-
23
-
24
-
25
-
26
-
27
-
28
-
29
-
30
-
31
-
32
-
33
-
34
-
35
-
36
-
37
-
38
-
39
-
40
-
41
-
42
-
43
-
44
-
45
-
46
-
47
-
48
-
49
-
50
-
51
-
52
-
53
-
54
-
55
-
56
-
57
-
58
-
59
-
60
-
61
-
62
-
63
-
64
-
65
-
66
-
67
-
68
-
69
-
70
-
71
-
72
-
 73
73 -
 74
74 -
 75
75 -
 76
76 -
 77
77 -
 78
78 -
 79
79 -
 80
80 -
 81
81 -
 82
82 -
 83
83 -
84
-
85
-
86
-
87
-
88
-
89
-
90
-
91
-
92
-
93
-
94
-
95
-
96
-
97
-
98
-
99
-
100
-
101
-
102
-
103
-
104
-
105
-
106
-
107
-
108
-
109
-
110
-
111
-
112
-
113
 |
 |
