MSI MS91F7 User Guide - Page 17
Important, model you purchased.
 |
View all MSI MS91F7 manuals
Add to My Manuals
Save this manual to your list of manuals |
Page 17 highlights
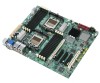
MS-91F7 5. Visually inspect if the CPU is seated well into the socket. If not, take out the CPU with pure vertical motion and reinstall. 6. Cover the load plate onto the package. 7. Press down the load lever lightly onto the load plate, and then secure the lever with the hook under the retention tab. Important Mainboard photos shown in this section are for demonstration of the CPU installation only. The appearance of your mainboard may vary depending on the model you purchased. Important • Whenever the CPU is not installed, always protect your CPU socket pins with the plastic cap covered (shown in Figure 1) to avoid damage. • Please refer to the documentation in the CPU fan package for more details about the CPU fan installation. • Confirm if your CPU cooler is firmly installed before turning on your system. 2-5
-
 1
1 -
2
-
3
-
4
-
5
-
6
-
7
-
8
-
9
-
10
-
11
-
 12
12 -
 13
13 -
 14
14 -
 15
15 -
 16
16 -
 17
17 -
 18
18 -
 19
19 -
 20
20 -
 21
21 -
 22
22 -
23
-
24
-
25
-
26
-
27
-
28
-
29
-
30
-
31
-
32
-
33
-
34
-
35
-
36
-
37
-
38
-
39
-
40
-
41
-
42
-
43
-
44
-
45
-
46
 |
 |
