Mackie 3204-VLZ4 Owners Manual - Page 8
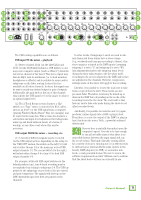
Typical Recording System, Right switches to hear the bass in mono. Congratulations - mixer
 |
View all Mackie 3204-VLZ4 manuals
Add to My Manuals
Save this manual to your list of manuals |
Page 8 highlights
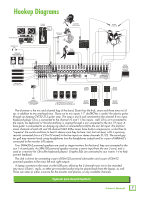
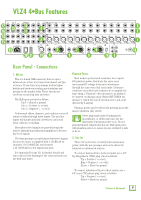
MR8mk3 Powered Reference Monitors L/R Headphones desTROYer on six-string Chris on keys Amplifier modeler Francis on bass 0dB -15dB gain hi lo ultra hi / lo bass 234 1 5 ks pb jdpa no jh midrange frequency treble master standby/ power/ fault standby power input 12 gain treble middle bass volume channel 1 gain treble middle bass volume 2 reverb TDSK master full on standby half off power DI Box Dustin on drums Anthony on lead vox Headphone Amp MONITOR SUBGROUP INSERTS 21/22 23/24 TIP SEND, RINGRETURN BAL / UNBAL BAL / UNBAL INSERTS (TIP SEND, RING RETURN) L4 3 2 1 20 19 18 17 16 15 14 13 12 11 10 9 8 7 6 5 4 3 L MONITOR MONO R4 SUBGROUP OUTS BAL / UNBAL 3 2 1 MONO LINE (BAL / UNBAL) 20 19 18 17 16 15 14 13 12 11 10 9 8 7 6 5 4 3 R INSERTS (TIP SEND, RING RETURN) 2 1 LINE (BAL / UNBAL) 2 1 AUX INSERTS STEREO RETURNS TIP SEND, RING RETURN BAL / UNBAL 6 5 4 3 2 1 2 1 ONYX MIC PREAMPS ONYX MIC PREAMPS L MONO AUX SENDS BAL / UNBAL 6 5 4 3 2 1 2 1 R 20 19 18 17 16 15 14 13 12 11 10 9 8 7 6 5 4 3 2 1 100 - 240 V 50 - 60 Hz 55W POWER ON PHANTOM ON TALKBACK MIC INSERT RIGHT LINE MAIN OUT TIP SEND RING RETURN BAL / UNBAL INSERT LEFT LINE MAIN OUT TIP SEND RING RETURN BAL / UNBAL INSERT MONO LINE MAIN OUT TIP SEND RING RETURN BAL / UNBAL OUTPUT U TAPE IN OUT L L +6 LEVEL R R UNBALANCED USB SERIAL NUMBER REVISION AVIS: RISQUE DE CHOC ELECTRIQUE - NE PAS OUVRIR REPLACE WITH THE SAME TYPE FUSE AND RATING. DISCONNECT SUPPLY CORD BEFORE CHANGING FUSE WARNING: TO REDUCE THE RISK OF FIRE OR ELECTRIC SHOCK, DO NOT EXPOSE THIS EQUIPMENT TO RAIN OR MOISTURE. DO NOT REMOVE COVER. NO USER SERVICEABLE PARTS INSIDE. REFER SERVICING TO QUALIFIED PERSONNEL. UTILISE UN FUSIBLE DE RECHANGE DE MÊME TYPE. DEBRANCHER AVANT DE REMPLACER LE FUSIBLE THIS DEVICE COMPLIES WITH PART 15 OF THE FCC RULES FOR THE U.S. AND THE ICES-003 FOR CANADA. OPERATION IS SUBJECT TO THE FOLLOWING TWO CONDITIONS: (1) THIS DEVICE MAY NOT CAUSE HARMFUL INTERFERENCE, AND (2) THIS DEVICE MUST ACCEPT ANY INTERFERENCE RECEIVED, INCLUDING INTERFERENCE THAT MAY CAUSE UNDESIRED OPERATION. Laptop Computer with audio production software Once the band has played a few shows and feel that the songs are up to par, then it's time to record them for posterity and all three adoring fans. The good thing is that the VLZ4 4•Bus mixer functions great in both environments... live and recording! Here is how to record the band in three easy steps: 1. Drum tracking: wire up everything as shown above. Bus the kick (panned left) to subgroup 1 and snare (panned right) to subgroup 2 so they are recorded to their own tracks in the DAW. They will show up on inputs 1 and 2. All four subgroup assign 1-2 Left/Right switches should be engaged so these signals may be monitored in mono. Bus the tom mics and overhead mics to subgroups 3 and 4; set the pans as preferred. The subgroup assign 3 left and subgroup assign 4 right switches should be engaged. These signals are recorded and monitored with the pan image as set up on the mixer and will show up as inputs 3 and 4. Check the levels carefully as they cannot be mixed later. The drums now need to be mixed in the DAW before overdubbing takes place. 2. Overdubbing: first, route the stereo USB return into the last stereo channel (23/24 or 31/32, depending on which VLZ4 4•Bus is being utilized). Next, route the stereo channel to the L/R Main so playback occurs in the headphones. Now route the bass to the L/R Main by sending the bass mic (panned left) to subgroup 1, and input 1 to track 5 of the DAW, while sending the bass DI (panned right) to subgroup 2, and input 2 to track 6 of the DAW. Finally, engage the subgroup assign 1 and 2 Left/ Right switches to hear the bass in mono. Congratulations, you are overdubbing with zero latency! 3. Rinse and repeat: follow these same steps for guitars, keyboards, vocals, kazoos, llamas, and whatever else you can fit in the studio. It's that easy! As the session progresses, the engineer, band, producer, A&R representative, and whatever posse may be present can crank the tunes through a pair of MR8mk3's and nod their collective heads to the beat. 8 VLZ4 4•Bus Typical Recording System
-
 1
1 -
2
-
 3
3 -
 4
4 -
 5
5 -
 6
6 -
 7
7 -
 8
8 -
 9
9 -
 10
10 -
 11
11 -
 12
12 -
 13
13 -
14
-
15
-
16
-
17
-
18
-
19
-
20
-
21
-
22
-
23
-
24
-
25
-
26
-
27
-
28
-
29
-
30
-
31
-
32
-
33
-
34
-
35
-
36
-
37
-
38
-
39
-
40
 |
 |
