Mackie 402-VLZ4 Owners Manual - Page 15
Low EQ, 10. Stereo Pan Switch (Ch. 1-2), 11. Level, 12. OL LED, 13. Main Outs, Sleeve = Ground
 |
View all Mackie 402-VLZ4 manuals
Add to My Manuals
Save this manual to your list of manuals |
Page 15 highlights
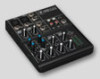
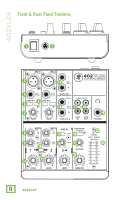
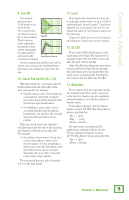
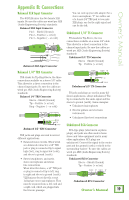
Owner's Manual 9. Low EQ This control +15 gives you up to +10 15 dB boost or cut +5 0 below 80 Hz. -5 The circuit is flat -10 (no boost or cut) at -15 20Hz 100Hz 1kHz 10kHz 20kHz the center position. Low EQ This frequency +15 +10 range represents +5 the punch in bass 0 drums, bass guitar, fat synth patches, and some really -5 -10 -15 20Hz 100Hz 1kHz Low EQ with Low Cut 10kHz 20kHz serious male singers. Used in conjunction with the low cut [5] switch, you can boost the low EQ without injecting a ton of subsonic debris into the mix. 10. Stereo Pan Switch (Ch. 1-2) With this switch out, each mono channel feeds both the left and right sides of the main mix equally. For example: • Playing a mono source: If you talk into a microphone connected to input 1, your sweet tones will be heard in both the left and right loudspeakers. • Overdubbing a mono source: if you are monitoring directly through the headphones, you can hear the overdub signal in both ears while you are playing. With this switch pressed in, channel 1 will play only in the left side of the main mix, and channel 2 will play in the right side. For example: • Recording a stereo source: If you have a stereo microphone connected to the mic inputs, or if you are playing a stereo source into the line inputs, each side of the source can be recorded discretely onto a recorder connected to the main or tape outputs. The pan switch does not affect channels 3 or 4, or the tape inputs. 11. Level This adjusts the channel's level from off, to unity gain at the center, on up to 12 dB of additional gain. Once the gain [7] has been adjusted for each channel, use the level to adjust how much of each channel appears in the main mix. Channels 1 and 2 use mono level controls, and channels 3 and 4 uses a stereo control. 12. OL LED This overload LED will illuminate if the input signal is too high. The signal level is measured just before the level control, but after the gain control and EQ. If the OL LED does illuminate, turn down the gain and/or the EQ controls until this will only illuminate occasionally when the input source is running high. Turning the level control will not affect the OL LED. 13. Main Outs These outputs feed the main mix out into the waiting world. They can be connected to the line-level inputs of power amplifiers, powered speakers, or to the line inputs of another mixer. To use these outputs to drive balanced inputs, connect 1⁄4" TRS (Tip-Ring-Sleeve) phone plugs like this: Tip = + (hot) Ring = -(cold) Sleeve = Ground For most music recording and PA applications, unbalanced lines are fine. To drive unbalanced inputs, connect 1⁄4" TS (Tip-Sleeve) phone plugs like this: Tip = + (hot) Sleeve = Ground Owner's Manual 15
-
 1
1 -
2
-
3
-
4
-
5
-
6
-
7
-
8
-
9
-
 10
10 -
 11
11 -
 12
12 -
 13
13 -
 14
14 -
 15
15 -
 16
16 -
 17
17 -
 18
18 -
 19
19 -
 20
20 -
21
-
22
-
23
-
24
 |
 |
