Mackie 802-VLZ4 Owners Manual - Page 14
Control Room Outs, 11. Phones, 12. Phantom Switch and LED, 13. Tape In, WARNING, BE CAREFUL - review
 |
View all Mackie 802-VLZ4 manuals
Add to My Manuals
Save this manual to your list of manuals |
Page 14 highlights
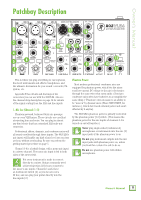
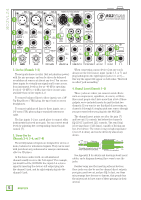
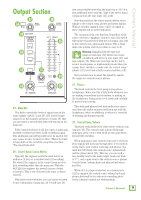
802VLZ4 1 17 16 2 4 5 6 7 3 18 13 14 15 12 8 9 10 11 10. Control Room Outs These TRS 1⁄4" balanced/unbalanced outputs allow you to listen to something other than the main mix. These outputs are often used to run a nice pair of powered studio monitors in a control room. The source is selected using the source matrix [30] switches (see page 19). You can choose to listen to the main mix, the alt 3-4 stereo bus (see mute/alt 3-4 on page 16), soloed channels, or the tape input. The volume is adjustable with the control room/submix [32] knob. 11. Phones This stereo jack will drive any standard headphone to very loud levels. "iPod"-type and computer headphones may also be used here, with a 1/4" male to 1/8" female stereo adapter. To learn how signals are routed to these outputs, see source matrix [30] on page 19. The level is adjusted with the phones knob [31], and the source is whatever the control room output is playing, such as the main mix, the alt 3-4 stereo bus, soloed channels, or the tape input. If you're wiring your own cable for the phones output, follow s tandard conventions: Tip = Left channel Ring = Right channel Sleeve = Common ground WARNING: The headphone amp is loud, and can cause permanent ear damage. Even intermediate levels may be painfully loud with some earphones. BE CAREFUL! Always turn the phones [31] knob all the way down before connecting headphones. Keep it down until you've put the phones on. Then turn it up slowly. 12. Phantom Switch and Led This global switch controls the phantom power supply for condenser microphones plugged into the mic [1] inputs. See the phantom power details on page 11 before using this switch. Press the switch in to engage phantom power to the three mic inputs. Press the switch out to turn it off. The LED will come on when phantom power is engaged. Phantom power is supplied to all three mic inputs at once, therefore, do not use a ribbon microphone in any of these inputs when phantom power is engaged. 13. Tape In Connect computer audio outputs, or tape recorder's outputs here, using standard hi-fi (RCA) cables. Use these jacks for convenient tape playback of your mixes. You'll be able to review a mix and then rewind and try another pass without repatching or disturbing the mixer levels. You can also use these jacks with a portable tape or CD player to feed music to a PA system between sets. WARNING: Engaging both the tape and assign to main mix b uttons in the control room source [30] matrix can create a feedback path between tape input and tape output. Make sure your tape deck is not in record, record-pause, or input monitor mode, when you engage these switches, or make sure the control room / submix [32] level knob is fully counterclockwise (off). 14 802VLZ4
-
 1
1 -
2
-
3
-
4
-
5
-
6
-
7
-
8
-
 9
9 -
 10
10 -
 11
11 -
 12
12 -
 13
13 -
 14
14 -
 15
15 -
 16
16 -
 17
17 -
 18
18 -
 19
19 -
20
-
21
-
22
-
23
-
24
-
25
-
26
-
27
-
28
 |
 |
