Mackie 802-VLZ4 Owners Manual - Page 16
Channel Strip Description, 21. Level, 22. Pre Fader Solo, 23. Mute/Alt 3-4
 |
View all Mackie 802-VLZ4 manuals
Add to My Manuals
Save this manual to your list of manuals |
Page 16 highlights
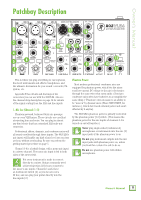
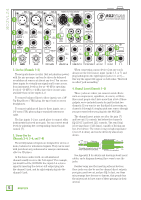
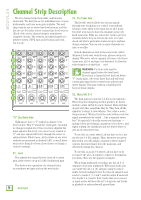
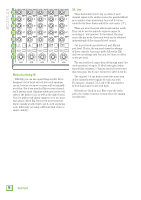
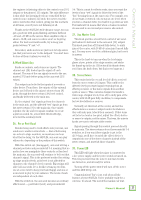
802VLZ4 Channel Strip Description The five channel strips look alike, and function identically. The first two are for individual mics or mono instruments, and have more gain available. The next strip controls mic or stereo line-level sources, and the last two are for either stereo or mono line-level sources. (Each of the stereo channel strips is actually two complete circuits. The controls are linked together to preserve stereo.) We'll start at the bottom and work our way up: 22. Pre Fader Solo This lovable switch allows you to hear signals through your headphones or control room without having to route them to the main mix or alt 3-4 mix. You don't even have to have the channel's level [21] knob turned up. Folks use solo in live work to preview channels before they are let into the mix, or to just check out what a particular channel is up to anytime during a session. You can solo as many channels at a time as you like. 28 27 26 25 24 23 22 21 "U" Like Unity Gain VLZ4 mixers have a "U" symbol on almost every level control. This "U" stands for "unity gain," meaning no change in signal level. Once you have adjusted the input signal to line-level, you can set every control at "U" and your signals will travel through the mixer at optimal levels. What's more, all the labels on our level controls are measured in decibels (dB), so you'll know what you're doing level-wise if you choose to change a control's settings. Soloed channels are sent to the source mix, which ultimately feeds your control room, phones and meter display. Whenever solo is engaged, all source selections (main mix, alt 3-4 and tape) are defeated, to allow the soloed signal to do just that - solo! WARNING: Pre fader solo taps the channel signal before the level knob. If you have a channel's level knob set below "U" (unity gain), solo won't know that and will send a unity gain signal to the control room, phones and meter display. That may result in a startling level boost at these outputs. 23. Mute/Alt 3-4 The dual-purpose mute/alt 3-4 bus is our signature. When Greg was designing our first product, he had to include a mute switch for each channel. Mute switches do just what they sound like they do. They turn off the signal by "routing" it into oblivion. "Gee, what a waste," Greg reasoned. "Why not have the mute button route the signal somewhere else useful... like a separate stereo bus?" So mute/alt 3-4 really serves two functions - muting (often used during a mixdown or live show), and signal routing (for multitrack and live work) where it acts as an e xtra stereo bus. To use this as a mute switch, all you have to do is not use the alt 3-4 [9] outputs. Then, whenever you press this switch, you will assign a channel to these unused outputs, disconnecting it from the main mix, and effectively muting the channel. 21. Level This adjusts the channel's level, from off, to unity gain at the center, on up to 12 dB of additional gain. This knob is the equivalent of a channel fader, so sometimes we lapse and say the word fader. 16 802VLZ4 To use this as an alt 3-4 switch, all you have to do is connect the alt 3-4 outputs to whatever destination you desire. Here are two popular examples: When doing multitrack recording, use the alt 3-4 outputs to feed your multitrack. With most decks, you can "mult" the alt 3-4 [9] outputs, using Y-cords or mults, to feed multiple tracks. So, take alt output L and send it to tracks 1, 3, 5 and 7, and alt output R and send it to tracks 2, 4, 6 and 8. Now, tracks that are in record or input modes will hear the alt 3-4 signals, and tracks in playback or safe modes will ignore them.
-
 1
1 -
2
-
3
-
4
-
5
-
6
-
7
-
8
-
9
-
10
-
 11
11 -
 12
12 -
 13
13 -
 14
14 -
 15
15 -
 16
16 -
 17
17 -
 18
18 -
 19
19 -
 20
20 -
 21
21 -
22
-
23
-
24
-
25
-
26
-
27
-
28
 |
 |
